Friday, November 11, 2011

Book of Treasures - Courageous


Continuing with the next page layout of the Book of Treasures, I didn't want to leave out my nephew's dislikes from the survey I had him fill out.  So I decided to use them in a unique way on this page by creating the antithesis of the things he didn't like -- more on that down a bit further in this post. 

In the photo above, my son Cody is on the left, and my nephew Marty is on the right...or at least his head is.  I used a picture of Cody when he was about 9yrs old sword-fighting (toys) with a friend.  In Marty's survey he said he liked sword-fighting with Cody, so I did a cut & paste for his face replacement.  The cross shape was cut from the Cricut Indie Art cartridge.

The vellum overlay is attached to a cardstock base with a photo that easily slides into a side pocket of the book. 


The bulls-eye zone (AKA The "X" zone) was also cut with Cricut's Indie Art cartridge, and the circles are some of the remaining cuts from the Star Wars layout.  I used a piece of transparency acetate to make the pocket, and backed the pocket with mirror paper.  The Choosing Medallions are tucked behind the blue disc and have cording to pull for either side.
The Choosing Medallions have a blue and a red eyelet side.  If you pull the red side, you'll see the things my nephew listed on his survey as his dislikes:  shirts w/collars, the sight of blood, and being bothered while playing (I ad-libbed a bit on the discs).  Then on the blue side is different perspective of those dislikes.  Just another interactive element for his mini book. 

For the parts of the book you may have missed, you can use the links below to check them out:

The Martinacious Book on YouTube
Book Info & Bug Tag
Dragon Slayer Page Layout
Star Wars Page Layout
Batman Page Layout

And speaking of "Courageous",  have you seen the movie yet?  I haven't had a chance yet, but I've heard it's very good, and can't wait to go see it.  You can click on the links for the movie trailer and theme song. 

Courageous Movie Trailer
"Courageous" by Casting Crowns

Finally, I can't end this "Courageous" post without sincerely thanking all our Veterans who have served, are still serving, and have given their lives for our freedom.  God Bless you all!
Lisa

Tuesday, November 8, 2011

Book of Treasures - Batman


A quick post today for the Batman page layout of the Martinacious Book.  I used several printables for these pages.  You can google Batman printables and you will find many options.  I got most of mine at the Coloring Pages website.  They have quite a lot to offer for a variety of subjects...including Super Heroes.  I stapled a sheet of  glittered vellum, sized about 1/2" smaller than my page layout, to the center of the page, and glued the printable "Bat Signal" to the center.


On the left side of the layout I created another pocket out of clear plastic (transparency) and tucked in a few coloring pages, as well as a tag I printed & laminated. 

The back of the tag says, "You Are Commissioned!
Go into all the world and preach the gospel to every creature.  Mark 16:15"
"Property of Marty, AKA Faithful Servant"

I wrote with a silver gel pen on the black cardstock, and added another printable, before adhering the clear pocket that holds the coloring pages & tag.  That way if everything is removed from the pocket there isn't a blank book page. 


The right side of the page layout was reserved for the Magic Coloring Page, in keeping with the coloring theme I created for Batman.  I used my computer to manipulate the printable into a black & white image, and printed it on transparency.  I printed the same sized image in color onto white cardstock.  The result shows the picture magically being colored as the tab is pulled upwards.  Pretty cool! 


Splitcoast Stampers has a similar method to creating this Magic Coloring Page using stamped images.  You can find the directions HERE for Splitcoast Stamper's "Magic Card". 

If you've missed the other posts for The Martinacious Book of Treasures, you can find them by clicking on the following links:


I'm nearly finished with the posts for the mini book pages and I already have a backlog of other posts I'm working on as well...including my own version of the popular "Smash" book which I call..."Lisa's Fragmented Book". 

With Thanksgiving nearly here, and Christmas on the way, I've been super busy in the craft room -- make sure you check in from time to time.   

Thanks for stopping by today!  Lisa

Friday, November 4, 2011

Book of Treasures - Star Wars

Can you find the Secret Pocket?

If you've been following along, I'm going through each page layout of the interactive mini, The Martinacious Book of Treasures  -- I didn't want to overload you with photos & information in just one post.  I made this book for my five year old nephew based on a survey I asked him to complete (with his parents assistance).  If you need to catch up, you can click on the links below:


Today I'm sharing a bit about the Star Wars page layout.  The Star Wars licensed paper I used was the foiled "Star Wars" titled blue cardstock (CS), and a 12x12 sheet that had a variety of black & red targets and blue & green silhouettes.  I used most of the silhouettes CS on this layout, and elsewhere in the book, and only half of the titled 12x12 CS. 


I used my 1 1/2" (3.81cm) & 1 1/4" (3.17cm) circle punch to punch out the round silhouettes and scissor-cut some of the target shapes, then I added some of his friend's names (from his survey), and phrasing, to a few of the silhouettes with a fine point Sharpie.  I used brads to move some of the silhouettes and targets for an interactive feature, before securing them to the page.  I cut a portion of the silhouettes CS for mini pockets to hold the "Property of" tags, and adhered them in place with Score-Tape adhesive on two sides only.


The "Property Of" tags, and the bookbag tags were printed onto Brochure paper for a nice finished print, and I used my Your Story to laminate the bookbag tags.  I found these great Lego Star Wars printables from Amy Locurto's fabulous website, Living Locurto.  They were a free pdf download which you can find HERE


The "secret pocket" card fits cosily on the right side of the page.  I just attached one of the silhouettes with a single strip of Score-Tape so the curved portion of the green tab allows it to slip snugly over the page into the pocket I created with my binding (more on the binding in a later post).  I used a silver gel pen to hand-write the words and corner-rounded the edges.


And finished the pocket card with a spiritual twist in the "Life Force Power".  Did ya see that comin'?  =) 

Thank you for following along...I'll be posting Batman's page layout coming up. 
Stay Tuned...
Same Bat-time, same Bat-channel!  Lisa

Thursday, November 3, 2011

Book of Treasures - Dragon Slayer

I recently uploaded my first YouTube video for this interactive Book of Treasures mini book, which I made for my 5 year old nephew based on a survey I sent him in the mail.  I'm going through the page layouts this week to give you a better idea of how I made the mini.  If you haven't seen the video yet, it can be viewed ---> HERE

For the title of the book I used my Cricut and the Sophisticated cartridge.  However, since this book was for my young nephew,  I wanted to change the "a" (with the hook) to the grade school "a", as shown in the above photo.  I did this by using Gypsy to weld the letters together, changing out the "a" in the Sophisticated cartridge to the italic "a" from the Plantin Schoolbook cart.

As mentioned in my previous post with the 'Bugs' tag, each page layout measures approx. 5 3/8" x 10 3/4".  This first page layout reflects Marty's love of swords.  I started with the printed vellum from the "Prince 'Quotes' Stack" which I adhered with a triangle eyelet and vellum tape.  I love these themed  puffy stickers because they were squishy and dimensional -- and great for kids.  I made a tag pocket with tag, and added the "crunchy" quote with a silver gel pen.

For the castle page I used the Life is a Beach cartridge and cut out the square card sandcastle in black, adding blue cardstock (CS) behind the frame for the castle in the clouds.  I cut the castle layers/flags in Marty's favorite colors (I used my Gypsy to help size the layers). The picture doesn't pick it up too well, but the blue CS has a foggy mist for the clouds and feels like smooth suede.  I achieved this by brayering on Liquid Applique and heat setting. 

In creating the door, I adhered the crossed-sword sticker to the front of the castle door using a paint brush to add baby powder to the exposed part of the sticker to remove the "sticky".  I used my Cuttlebug to emboss a strip of CS with Tim Holtz Burlap folder and painted on Sunflower Gold Perfect Pearls for the shimmer effect, before accordion folding and attaching to the front of the castle and door.  I used Tim Holtz game spinner pieces, which I bent to fit the depth of the castle door, and attached them to the page with brads.  They easily swivel aside to allow the castle door to open -- showing the "streets of gold", a cross, and my nephew's favorite verse, James 2:1-4.  Finished the page off with the "Citizen of the Kingdom" hardened epoxy sticker.

In creating this book for Marty using the things he liked/disliked on his survey, I decided to give each page a spiritual reference as well.  So lots of hidden innuendos and such in this book. I used the Tags, Bags, Boxes & More cartridge to cut my tag (bvltop blackout), and distressed the edges.  Then used a Sharpie to write information about the Amour of God on one side, and added more stickers & rub-ons on the other. 

TIP:  When I cut tags with my Cricut, I use the Auto Fill to cut several at once -- that way, when I need a quick tag I always have one ready to embellish.

That's about it for today.  I'll be back soon with my next page layout...Star Wars!
Thanks for dropping by, Lisa

Tuesday, November 1, 2011

Book of Treasures - Bugs


If you haven't seen my YouTube video for this book yet, you can view it HERE.  I'll be going through the book this week for some extra information on the pages I created.  The book has already been delivered to its new owner, and I have it on good authority (from his parents) that Marty loves his book!  Yeah! 

As mentioned in my video & previous post, I created a survey to send to my five year old nephew asking all sorts of fun questions regarding his likes & dislikes and such.  I also sent a dollar with the survey to thank him for taking the time to complete and return the survey to me (with parents help of course).  The survey will be great to look back on years later...maybe in a scrapbook layout?  I then used the survey to create this personal & interactive book for him.

I began by making my pages first (before the cover), that way I could decide if I wanted a separate order for them, pockets, etc.  Each book page measured 5 3/8" square, and each page layout was approximately 5 3/8" x 10 3/4".  Some pages were lengthened by 1/4" or so to accomodate extra embellishments or pockets needing additional width.  For each layout page, I only created the inside pages and, when folded, kept the front & back clean until I was ready to assemble the book.  To give the book additional support after it was completed, I made a sturdy binder/holder out of chipboard & sticky back canvas before covering it with scrapbook papers.

The book image below shows the page layouts completely put together with velcro latch, and ring pull.  I used sticky back canvas for the binding, and grosgrain ribbon for the latch & attachments...all this was hidden under an additional 5 3/8" deco cardstock front/back.  For more precise instructions & visual aid, I'll be sharing a video on this binding method -- coming soon. 


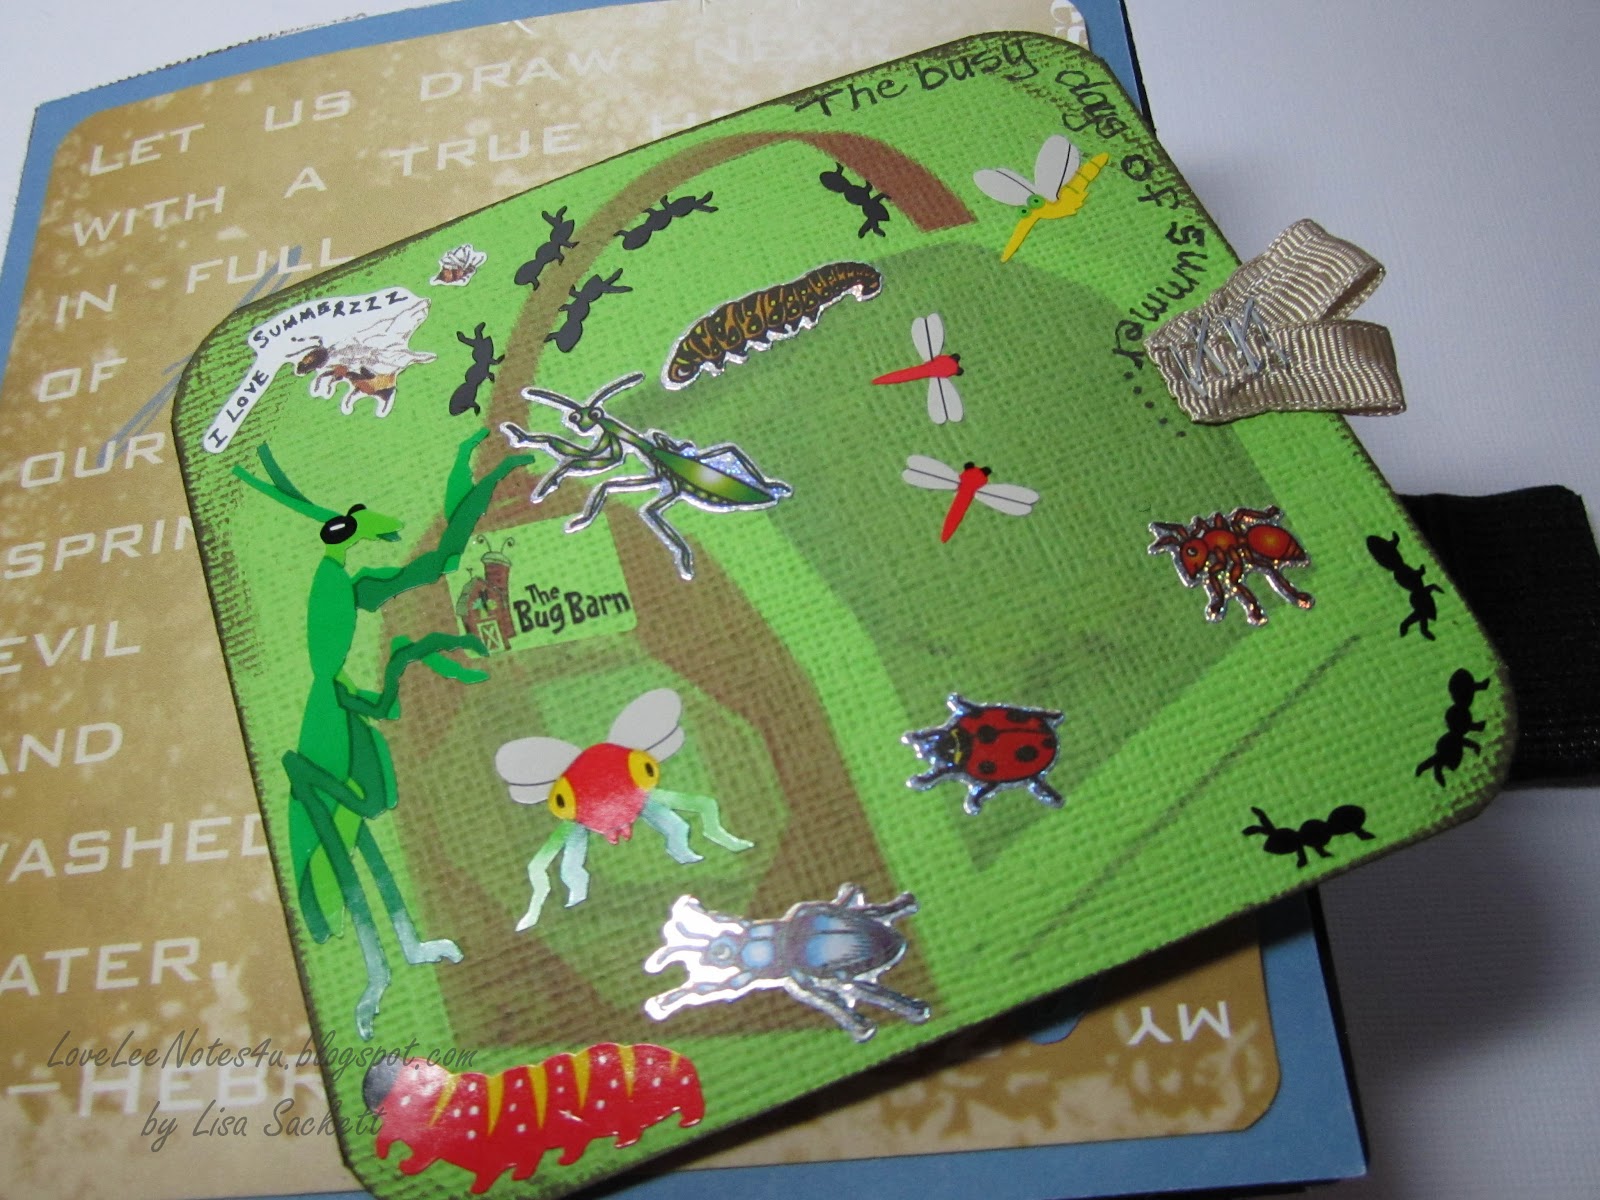
After opening the velcro latch, a ribbon pull is the first interactive feature.


The ribbon pull reveals a Bug Barn with a lot of bug stickers.  I found a picture of a bug barn online (one of his favorite toys) and printed it directly onto cardstock, after manipulating the color and adding the Bug Barn Title box.  I corner-rounded the edges and added edged with Walnut Stain ink.


On the other side I used a sticker of a 1975 Beetle Voltswagon and added more bugs and the title "The busy of days of Summer!" I also printed a petite wallet picture of my brother & nephew onto thin copy paper, cut their faces to fit in the car windows, and adhered with Scotch Quick Dry glue. This added more snippets of his survey: spending time w/Dad, loving summer, the color green, and keeping bizzzzy.


Before I sent the book, I used a tape gun to change the Beetle's year to 2006...the year my nephew was born. So already, before the book has even been opened he has a lot to look at and pick up on. This helps make the book interesting enough to see something new each time it's looked at, and stimulates the brain -- working out any "hidden" messages.

Thanks for checking in -- hope you're having a bug-free day.  I love those!  Lisa

Tuesday, October 25, 2011

The Martinacious Book - 1st YouTube Video


Okay, guys.  I finally uploaded my 1st YouTube video.  It's a book I've been working on for my nephew, Marty.  I'll have more information on the pages of the book in later blog posts. 

You may recall from earlier posts that I made surveys to send out to my nieces.  When I receive the surveys back I use the information to make unique Menus and Restaurant Kits for them (between the ages of 4-6).  Marty is the first nephew to return a survey, and instead of making a menu kit for the boys I decided I'd make an interactive book using most of the responses in his survey. 

Hope you guys like the video -- Remember, this is the first one I've made so I have some work to do yet.  But I'd love to have your feedback on what you liked, how I can improve, and also of videos you might like to see. 


Thanks for checking in.  Have a great day!  Lisa

Thursday, October 13, 2011

Batty Door Cones

The glitter really picks up the light ...
you might even say it casts an eery glow...okay, maybe not.
While I'm not a huge fan of "halloween", I'm definitely an advocate for candy!  As a kid I would love to dress up and go "Trick or Treating" on what we used to call, "Beggar's Night".  It was all in good fun, especially when we skipped the really scary houses!  The best part was when we poured out all our candy onto newspaper and sorted out anything that was opened, which went immediately to the trash, and kept all the good stuff.  My favorites have varied over the years...but ya never can go wrong with anything chocolate.  =)

My son's too old to trick or treat, so I made these Batty Door Cones to hang on doors around the house -- strategically placed around my craft room -- and be filled with candy!  I would've taken pictures with the candy inside the cones...but somebody ate all the candy so far.  Not to worry -- I went out and bought some more today.  =)

I'm entering in the Cricut Circle's Monthly Challenge for October, where I needed to make a Home Decor project using two or more Cricut image cuts. Splitcoast Stampers has a tutorial for the cone treats, and there are a variety of others on the web.  But for my cones, I used my Cricut for all the cuts!  I used Plantin Schoolbook cart to cut a circle using the Fit-to-Page feature (one circle makes two cones).  Then I cut the circle in half.  For each half circle, I marked the center of the straight edge -- then starting at the center mark I cut a 1/4 of the half circle away.  I used score-tape to secure the cone shape, then secured two large eyelets to the sides to hold the ribbon hangers. 

You don't need to have the Cricut Cake machine to use the Cricut Cake
cartridges.  There are some FAB images to cut on those!
But I'd love to have a Cricut Cake machine -- just the same!  =)

For the images I used the Holiday Cakes cartridge for the open winged Bat (including the layers), and the Boo w/the attached bat, and also for the Moon & Bat silhouette which I placed on the inside back of each cone.  A little white inking on the "Boo", and glitter on the bats almost completes the cones.  All they need now is a good helping of candy!

Here's hoping you get to satisfy your sweet tooth soon too!  Lisa

Bosco & Tea -- Not For Me

Cricut Circle Recipe Challenge using:
A Title, 2+ Cricut Cuts, & 3 or more Buttons
A while back my hubby & I were at a specialty store with old fashioned candies when I saw a "Bosco" chocolate bar.  I was so excited because I remembered growing up with my parents telling me about drinking Bosco in their milk when they were kids.  I guess it was something like Ovaltine??  The memory I have wasn't of them telling me how it tasted, but of a silly/irreverent kid's rhyme they used to sing.  I guess there used to be an advertisement singing, "I love Bosco, Bosco is for me...", However,  the jingle my parents sang was very different -- kids making up songs, just as they do today -- but apparently it stayed with me all these years.  Ha Ha...left an impression on me.  We used to laugh about it -- still do.  ANYWAY...said all that, to say that I Finally got around to making it into a pull-up treat for my Mom.  And since I'm seeing her this weekend, I'll be taking it with me (gee, I hope the chocolate's still good).  =)


The jingle that inspired this strangely titled treat wrapper goes like this:  "I hate Bosco, Bosco ain't for me.  Mommy puts it in my milk to try and poison me!  Well, I fooled Mommy.  I put it in her tea.  Now there ain't no Mommy, to try and poison me!"   Hard to believe the kids were singing this in the 50's...ha ha!!  I guess it's like anything that's supposed to be good for you...when you're kids, you just think your parents are out to get you.  Anyway...moving right along...

I'm also using this for one of Cricut Circle's blogaversary challenges, the Recipe Challenge, where I needed to have A Title, 2+ Cricut cuts, and 3 or more buttons.  The Title word "your" and the silver Tea Set (cut from mirror paper) was cut from the Heritage cartridge, and the Tea Cup & the words "Drink, Tea" was cut From My Kitchen cartridge -- the word was actually "Drinks", but I cut off the 's'. 


My Mom and I both actually love our tea.  So this is just a joke I think she'll get a kick out of -- good memories & fun times!  I forgot to photograph the back where I put the irreverent jingle.  But it's there...and I'm sure she'll figure it out as soon as she pulls the ribbon.  Ha ha....

For more info on the treat wrapper & to see a previous version I made for my hubby, you can check it out HERE.

Thanks for letting me indulge my wacky side.  =)
Have a great day, and don't forget to "Drink Your Tea".  Lisa

Wednesday, October 12, 2011

Hay Is For Horses & Greetin Your Neighbor


Cricut Circle Exclusive Cartridge - Pop-Up Neighborhood
Happy Blogaversary to the Cricut Circle Blog!  I am happy to be part of the Cricut Circle membership as one of their charter members.  There are some great benefits to being a Circle member which you can check out HERE, and even find out about some sneak peaks into what is going on at the Circle blog.  If you're looking for some more Cricut inspiration you can check out more on the Cricut Blog while you're there.  I don't always use my Cricut exclusively for creating, I kinda go in spurts, but I do Love it's versatility!  And I also don't always use the image as it was intended on the cartridge -- which gives me a lot more creativity.  Check out the Masks of the Manor I made for halloween last year (using the French Manor cartridge) and you'll see what I mean.  =)

For this card, I used Cricut Circle Cartridge, "Pop-up Neighborhood" for the images, and Plantin Schoolbook for the letters.  Super easy really...my background paper was blue & green cardstock (CS) with a dark brown torn out for the dirt road.  I used the scarecrow for the driver and added varied cuts of hay to the back of the truck -- cutting slits in it to nestle snugly between the truck rails. I added a bit of Tea Dye ink to the truck to give it a touch of "off-road" dirt, and added a bit of inking here & there for added intensity.  A play on words made this card complete.

Hay Ya'll...be sure to stop by anytime...good neighbor!  Lisa

Monochromatic Card & A Quick Glue Fix

This just might be my first monochromatic card!
I've been working on several cards and projects this week for the Cricut Circle Challenges, for their blogaversary.  This particular card is for the Monochromatic Color Challenge -- basically light & dark shades of one color.  Typically black would've been added for darker shades, and white for the lighter varied shades.  The Cricut carts I used:  Thanksgiving cart for the "wheat", and "Thankful" from Teresa Collins Sophisticated cartridge.

If you saw my recent Anniversary Card with the TIP about Glimmer Mist Containment, you may have remember I pointed out that in gluing some of the letters for "Always & Forever" there was some glue seepage, which looked a little messy when it dried.  I usually like using a glue pen for those smaller pieces, but lately I've really liked using my Scotch Quick Dry Adhesive, which is a wet glue.  The problem is that I get in a hurry and sometimes put too much on, and it seeps out from under the smaller pieces. 

So here's my TIP for today:  Before the wet glue dries...just add a bit of glitter, or flocking.  When the glue dries I simply brush off any remaining loose glitter.  It works great to camoflauge the glue, and adds a bit of texture to your project as well.  In this card I used Martha Stewart's tinsel glitter, I just thought it added to the wheat & harvest theme.  You can use this tip for dry ahesive as well, but stay tuned for another great adhesive tip next week -- another idea for removing stray dry adhesive (and one I use all the time).  =)

For more information about Cricut Circle membership, and finding out about getting some Sneak Peaks each month, click HERE.  If you're not a member of Cricut Circle, not to worry -- you can find lots of inspiration on the Cricut Blog, open to everyone.  On the Cricut Blog's right sidebar, you can view projects posted by a particular cartridge.  You can do the same thing in my sidebar under Search LoveLee Notes, by typing the name of the cartridge you're interested in.  If I have made a project with that cartridge, you'll be able to see all projects I've made with that cart.  And it's updated after each blog post so you don't miss a thing.  =)

I've got a few more projects to share, so I better scoot along for now. 
Thanks for stopping by!  Lisa