Wednesday, June 29, 2016

Wish We Were There


Not your average postcard(s)!  Week 4 of the Summer of Creative Chemistry was my inspiration for these next postcards - and yes, I'm on a Postcard kick, but these could very easily be cards, or added to journals or scrapbook pages, cut into tags, and more.  It really is a great substrate to work with for a one-layer card - and postage is so much less to send out.  AND as a bonus, you just might inspire a postal worker with your creativity.

If you don't want to buy the watercolor postcards I mentioned in an earlier post, you can make your own, as I did with these cards, with heavy cardstock (or in my case, glossy cardstock).  You can draw lines on the back with a ruler for the address and simply add a postcard stamp to mail.  There are also a variety of stamp sets available for purchase to create postcards as well.  You can simply go onto Amazon and type in the search engine "Postcard Stamp" in Arts & Crafts and several come up for purchase.


I used Tim Holtz' Alcohol Ink Agate technique for these postcards. We have friends that live in Australia and we've been very blessed to be able to visit - so of course, I'll have to send this card to them.  For the Sydney Australia skyline I used TH Cityscape stamp set.  I used Meadow, Lettuce, Pesto, Stream, Cloudy Blue, Snow Cap, & Silver alcohol inks, and hand wrote the message with a sharpie.  Looks like I picked up bits of pink ink as well from my craft sheet when I created the other postcard.

I stamped a second generation stamping upside down below the skyline, and smudged it a bit for effect.  However that ended up smudging the Sydney Harbour Bridge before it was dry.  But I still liked the effect, and I don't like to waste anything - so I'm okay with the imperfections.  And I do know the skyline doesn't match up, but I still think it's cool.


For my last postcard I used Shell Pink, Butterscotch, and Wild Plum alcohol inks, as well as the following Tim Holtz stamp sets:  Birds and Baubles, Crazy Talk, and Shabby French (one of my most favorite stamp sets!).  In hindsight, I wish I would've stamped the smaller chandelier from the Shabby French stamp set and offset it a bit to the left - but I'm okay with it.  Oh - almost forgot, I used a second generation stamping to get the script background to be lighter.  And I used the script stamp from the Tim Holtz "Letter to Santa" stamp set.  I love that stamp with the delicate script.

Well, that's all for today.  You might want to consider making your own postcard and mailing it to someone special - you will really make their day!

Tuesday, June 21, 2016

Perfectly Fun


Week 3 into the Summer of Creative Chemistry and I'm working with one of my most favorite products ever -- Perfect Pearls!  I used the Perfect Distress Mist technique and then the Perfect Splatter Distress technique with my "leftovers".    I normally don't worry about mixing colors where they will look like mud - I just try what I like and have fun playing.  I usually try to work with whatever comes out.  To learn more about these techniques, check out Online Card Classes with Tim Holtz.  He's going through his Creative Chemistry classes 101, 102, and soon to start is 103 in August.  You can sign up and join in the fun anytime with lifetime accessible content, PDFs with step by steps, and more!


The stamp set I used for the Perfect Distress Mist technique is one of Wendy Vecchi's, "Tools for Art".


And the stamp sets I used for the Perfect Splatter Distress technique are Tim Holtz' "Words for Thought", "Sketch", "Bird Crazy", and "Crazy Things".

I used the Watercolor Postcards again for these techniques - and I'm looking forward to sending these out at the end of the Summer.  How fun is that?!

Today is a good day to have some fun!


Sunday, June 12, 2016

Bon Voyage Postcard


It's so nice to be back to playing in my craft room.  Today I created another postcard for Summer of Creative Chemistry Week 2.

I created a random background all with Distress Stains using:  Peeled Paint, Weathered Wood, Broken China, and Wild Honey (and Picket Fence).  I guess I liked the look of the Wild Honey stain as a sort of sunset, because I pulled out my Tim Holtz Artful Voyage stamp set and went to town using the Stamping with Stains technique.

I ghosted the ship before stamping with Archival Jet Black and followed up with Distress Black Soot ink so I could smudge with with the Picket Fence; I love the end result of the mottled ship. I used Pumice Stone ink to smudge the edges and set it aside to dry before I over-did it.

I'm loving the watercolor postcards - so easy to use and less stress to work on because it's a one layer card, essentially.  I'm using the Fabriano Watercolor Postcards today.  Since there's a bit more texture, any stamping will look a bit more sketchy, which I liked for this card.  I think these will be so fun to mail out later.

Thanks for dropping by -- Craft on!

Saturday, June 4, 2016

Riding Out the Storm


It's hard sometimes to let go of the busyness of our daily lives. Whether stress from work, major events, or just daily living in moments, we are all trying to make things work so we can, at some point, relax!  I I love this quote on this postcard because in all the chaos around us, God has a plan to take care of us!

I've been trying to get back to my love of creating, and just got the next kickstart I needed through Tim Holtz Summer of Creative Chemistry over at Online Card Classes .  I created this Technique Postcard for the weekly challenge and I'm excited to be creating again.

The Distress Ink colors I used for the background are Broken China, Mermaid Lagoon, Stormy Sky, Iced Spruce.  I edged it with Hickory Smoke and used Tim Holtz Birds, and Hot Air Balloon stamps in Hickory Smoke & Peeled Paint Distress Ink. Finally, the sentiment was stamped in Archival black ink (sentiment stamp by Our Daily Bread "Anchor" stamp set).

Class is in session - check it out!

Thanks for stopping by!

Lisa

Thursday, November 19, 2015

Time to Create...Again

It's hard to imagine 2 years has gone by since I've written on my blog -- and yet I've been busier than ever.  I've been through Graduations, College visits, Weddings, Retirements, moving, job searches, 1st home buying, 1st baby granddaughter, and much much more.

Now that I'm finally settling in I'm hoping to get back to blogging and creating again.  I had a great kick-start recently in Columbus, Ohio with this year's Create Event 2015, from Simon Says Stamp.  It was full of inspiration and amazing designers, and making new artsy friends was a true bonus!

New Friends:  Karen, Debee, and Colleen

Lawn Fawn's Kelly Alvarez - Just as sweet in real life

Beautiful Fall Venue

Which door to enter?  This is when I met Karen!

Fantastic Designers, Great Techniques, Loads of Fun

Working on my "to buy" list

Laura Bassen & Kristina Werner - great demos & lessons

My friend, Karen - Yep, she won an amazing prize
from Altnew & Simon Says Stamp! and yep, we were jealous.  :)

A bit star struck of Jennifer McGuire - but she is
so down-to-earth, and yep - Amazing!

Shari Carroll - holding my recently inked butterfly.
Refreshing & Fun personality!

Me & Shari, with my Shari inspired art!

Me & Jennifer - great to finally meet her in person!

You can enjoy visiting the Designer's Blogs by clicking on their names below:

Jennifer McGuire
Shari Carroll
Kelly Alvarez - Lawn Fawn Blog
Kristina Werner
Laura Bassen
 

And now, it's time to get back to creating again.  In the meantime, keep a watch out for new projects I've been working on...as well as a look into the some of the events I worked on in the past two years.

Until then - Happy Journeys!  Lisa


Monday, November 25, 2013

AJ PanPastels Wise Men


I am posting a page I completed in my Art Journal (AJ) using a variety of Christmas stamps by Tim Holtz, and a Stampendous Santa stamp.  I once said I had no current plans to get into the PanPastels and now I teach how to use them.  Yep, I got hooked and now I am constantly devising new ways to use them.  I love this art medium for mixed media!

If you haven't used PanPastels before, they are simplest to explain as a type of chalk called pastel.  They are a soft refined pastel pigment powder that is compressed into a jar that seems almost creamy.  However, the binding agent used in these pastels is unique in that the dust content from usage is extremely low, while the pigment is a higher artist quality.  The price point is initially higher, but their longevity helps even the score.  You can use these with a variety of tools & products, but the Sofft Tools are my favorites...besides using my fingers.  They apply like a paint, but don't need any water.  Oooo, and did I mention clean up is a breeeeeze.  Keep an eye out on my blog, as I'll be sharing more about these little beauties, including tutorials & videos -- hopefully in the new year. 

Regarding today's mixed media page:  believe it or not, this page layout is super simple to complete -- you're basically just working in layers. 
1.  The complete background is a light dry wash of PanPastel. 
2.  Randomly stamped with several TH stamps using VersaMark.  I lightly went over the stamped images with a slightly darker pastel shade.  (TH stamp sets:  Shabby French, Reindeer Flight, Letter to Santa)
3.  Sprayed Krylon's Workable Fixatif over the pages and let sit a few minutes until dry.
4.  Stamped the Angel & Joyful Christmas (TH Joyful Song) again with VersaMark, and heat embossed using Ranger's Chinese Red Antiquities, and Stampendous Aged Silver (I love the tarnished silver look for this page).
5.  Using black Archival ink I stamped the Wise Men.  I didn't apply too much pressure to the stamp so that the image would be somewhat mottled. 
6.  For the Santa image (by Stampendous),  I stamped the Santa image with black Archival ink onto copy paper before crumpling it up.  Then opened it up and created a dry wash of pastel.  I love how the paper's creases picked up an extra "shadow" of color.   I used the pointed Sofft Knife with various colors of the PanPastels to "paint" the Santa.  Finally, I ripped the edges, sprayed it with the Fixatif, and adhered it to the page with Scotch Quick Dry adhesive once dry.


That's it.  Most projects & page layouts can look overwhelming to re-create when you first see them.  But if you break it down by layer, it really makes them very do-able. 

Thanks for stopping by today.  Hope your day is beautiful!  Lisa

Tuesday, August 27, 2013

My Craft Closet

It has been a looong time since I've blogged, and I'm sad to say it might be a couple more months until I can get back into the groove.  As you know, we've had some major life changes this year...starting with our youngest son's high school graduation and move to college, our eldest son's wedding, my husband's military retirement, and finally ending the year with a temporary move while we look for jobs & and a new home.  I will get to blogging some of the things I've worked on for these events...eventually.  In the meantime, thanks for hanging in there!

For today, I'm posing a video of my craft closet -- sort of a teaser before seeing my actual craft room video in an upcoming post.  I've had several requests to see my crafting spaces, and with our move being so close now I asked a friend come help with the video taping. 

My craft closet is just that...a walk-in closet of sorts.  The space is more long than wide, but I'll show you how I have it set up.  Keep in mind that we are moving and it's not as tidy as I'd normally like it.  But hopefully you'll get the idea.  =) 

I also showcase towards the end of the video how I've been doing my stamp storage/organization.  If you've read my stamp organization post, you'll notice I am no longer using the clear DVD cases for my stamps -- I have more space utilization with the pockets than the DVD cases.  I've actually decided to use the cases for something else...but I'll save that for a later post. 


If you're reading this post in an email subscription, please click HERE to view the video & comment on the post.  Comments are once again enabled for everyone (love getting your comments) -- I had to close comments for awhile because of a hefty amount of spamming. 

Below are a couple links to some of the stamp pockets I showcased in the Craft Closet video. 

TH Stamp Storage Pockets (7" x 8 1/2") - As long as the TH stamp pockets are being produced, I will continue to use those -- my absolute favorite for the size of stamps that will fit in them. 

Office Depot brand Pockets (5" x 8") - For the stamps that are sized the same as the Lawn Fawn stamps or smaller, I am seriously thinking about using the Office Depot clear pockets.  I love their durability.  I have found better prices online than in the stores...as of the writing of this post.

Avery Clear Pockets (5 1/2" x 8 1/2") - The clear page protectors are still a good solution for those that are looking for a more economical solution.  However, I would recommend adding 5" x 8" cardstock inside the pockets to make them sturdier.

(If you had trouble seeing the video in this post, please click HERE to view in YouTube)

In my upcoming craft room video I also show how I store my TH stamp sets AND a great (and inexpensive) way to take the stamps sets with you to a crop, etc.

I know it's been a while, but I appreciate you taking the time to stop by!  Lisa

Thursday, March 28, 2013

Graduation, Wedding, and Retirement -- Oh My!

Printibles by Wedding Chicks, Cricut Die Cut Birdcages (French Manor cart)
First of all...thank you for sticking with me, even though I haven't posted in quite a while.  I thought last year was busy, but this year takes the cake!  January & February I was working virtually full-time, during which we lost our beloved dog, Hercules, of old age (15 years), and a dear uncle on my husband's side unexpectedly.  Then already in March we've made a college visit with Cody, our youngest son (almost 18) who is graduating in May, plus two separate poetry reading venues (by Cody); and my husband had foot surgery...of which he is now recovering.

Our year had already included Cody's high school graduation and his subsequent move to college in the summer.  But then we added my DH Chris' retirement from the military towards the end of this year, which also includes a permanent move back home -- to Ohio.  We haven't lived there since 1999, so it will be strange moving back...but also good to be back around family after so long.  Of course with a move comes job hunting, and house buying.  A crazy year to be sure.

But let's just throw something else into the mix...shall we?!  Our oldest son Nathan (nearly 24), proposed to his girlfriend, Hannah, the beginning of March and the wedding has been set -- ** wait for iiiiiit** -- this year too.  In fact, he will be getting married just two days before Cody goes to college -- and all that happens just one month before Chris's retirement ceremony (which will be a month before we move)!  I'll barely have time to think about the whole "empty nest" syndrome.  Yup...this is a CraZy year for SURE.

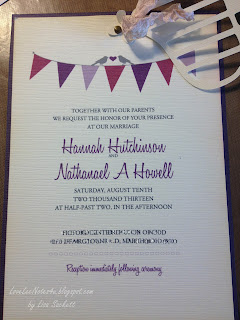
Which brings me to a glimpse of what I've been up to this month ... working on Wedding Samples!  I had my year pretty well planned out until Nathan came to visit with his "finance".  Surprise!!  During their short visit they decided on a somewhat vintage "Birdcage" theme for the wedding with colors dark purple & blush pink.  Nathan talked up the announcements I had made for his Graduation, so they asked me to put together some samples for wedding invites -- on a budget. 

I started about by doing a lot of research for Birdcage themed weddings, and weddings with their color palette ideas.  To keep track of some of my research, I created a board on Pinterest called, Birdcage & More Wedding Ideas -- which you can see HERE.  I also found this fantastic website for printing invites, RSVP cards, table numbers, and much more.   You can check out Wedding Chicks website HERE (you're gonna LOVE it!). 

The following invites are all created from the Wedding Chick's free printables to which I added some stamping using Stampendous "Tweet Cages" set.  The ribbon is white seam binding ribbon (Hug Snug) that I crinkled & colored using Spun Sugar distress stain & Antique Linen ink (which tones down the bright pink). For the more vintage ribbon look I added light touches of Walnut Stain ink.  Since the color hues haven't been determined "exactly" there are a variety of shades used in the samples at this juncture.


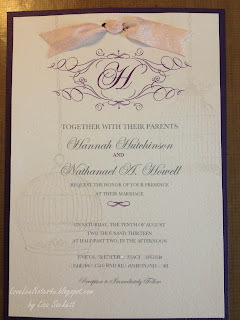
Flat Bow (postage friendly)
stamped birdcages on chain
Pumice Stone ink, 2nd generation stamping
birdcage masked using Antique Linen ink
and ink blending tool
stamped birds

Bo Bunny brad holds cage in place
crinkled ribbon around cage only
This invite may cost more in postage with
the added depth of brad & bow
die cut birdcage from French Manor cart
smaller brad & dangly ribbon could help postage costs
 

showing cage moved aside
edges inked with Antique Linen
RSVP card printables w/envelopes
attached to back of invite w/photo corners
(they're on straight, just angle of camera is funny - lol)
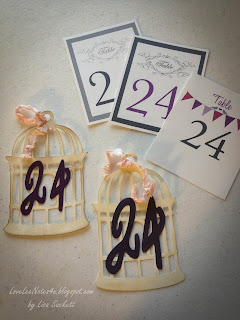
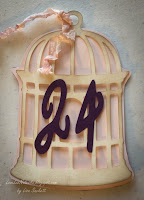
Table Number printables from website
and die cut ideas using cage (French Manor cart)
and numbers from Heritage cartridge
 
with pink backing

with purple backing


Place Cards die cut from Thanksgiving cart
the two smaller ones show as individual name cards
The larger one is more budget friendly:  one per table
and would include family names for that particular table

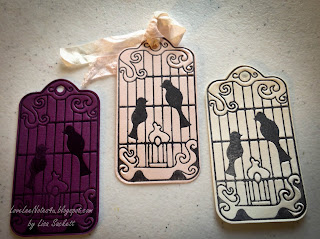
die cut with Fiskars Fuse: letter press plates for tags
these could be used for place cards, wrapped around the napkins,
or for a variety of other uses/ideas


battery operated tealight under dome
One of the PINS I added on Pinterest, was of over-turned decorated wine glasses (click HERE to see inspiration photo) using the base for a candle.  I loved the idea, thinking I could use the dome of the glass to add the birdhouse theme.  Generally you can find water globlets/cheap wine glasses at a dollar store or thrift store -- so being budget conscience (and since using birdcages to decorate every table would be pricey), I created this version using my Cricut (Sophie cartridge, & Gypsy to weld extra bird).  There are several cartidges that have birdcages on them, so it would be interesting to make several variations of these for the table decs.

I also cut birdcages & lovebirds from random cartridges at 1 1/2" each for confetti -- any smaller and the birdcage bars are too thin to hold up.  Other cartridges used were: Straight from the Nest (confetti), and Elegant Edges (for the candle mat)

I forgot to photograph the washi tape flags (Recollections birdcages) I made for cupcakes, and the cupcake wrapper of the lovebirds from the Cupcake Wrapper Lite cartridge...but they turned out cute too ... IMHO.  =)

And that's about it for today.  With all that's going on this year you'd think my blog would be severely neglected.  But I've been so busy with all sorts of projects that I'm hoping to blog more often.  The most time-consuming part of blogging is writing out all the technical jargon.  So if at some point I don't give enough information, please leave me a comment with your questions and I'll be sure to get back to you.

Hope the birds are singing for you today -- and thanks for stopping by!  Lisa

Monday, December 24, 2012

The Jesus Gift - Our Christmas Tradition

I'd like to share a story about our Christmas tradition of the "Jesus Gift"; which first graced it's presence under our tree in 1992. 

It was getting close to Christmas and I was feeling extremely depressed the closer it came.  I had recently become a single Mom, and was having a hard time with the holiday festivities.  The church we were attending was having a sit-down dinner and I had decided not to go, as my heart was just not in it.  However, my mother kept encouraging me to go -- and finally I gave in. 

I can still remember how lovely the table looked.  As I sat down I noticed a simple package had been set at each place setting.  The packages were wrapped in white tissue paper & tied with green ribbon -- the tag attached contained the following poem:


This is a very special gift,
You can never see.
The reason it’s so special,
Is it’s just for you, from me.

Whenever you are lonely
Or even feeling blue,
You only have to hold this gift
And know I think of you.

You never can unwrap it,
Please leave the ribbon tied;
Just hold this box
Close to your heart,
It’s filled with love inside.
                                       - anon

The thought of that little package, at such a difficult time in my life, was a blessing to my soul -- and just what I needed.  I brought it home and placed it under our Christmas tree, as the first gift of Christmas.  And that was when I came up with the idea of the "Jesus Gift" -- Jesus gift of love to us being himself...the reason we celebrate Christmas. 

And so our tradition began -- Each year the first gift under the tree is the "Jesus Gift".  And it's also the first present taken out from under the tree Christmas morning.  One of our family will read the poem attached, then we'll each take turns holding the "gift" and say what our birthday gift will be to Jesus for the following year.  Instead of New Year's resolutions, we offer a gift to Jesus.  It might be the gift of volunteering more, or reading the bible in a year, or maybe even something more specific. 

This year I had to re-package ours as it was quite yellow with age, so I used one sheet of 12x12 white cardstock to wrap a small box.  With the leftover card I stamped an image on the front of the manger scene "O Holy Night", by Northwoods, and printed the poem for the inside.  The simple green ribbon is seam binding.

Every year I try to make a few of these gifts to share with others.  I like to share the story of the tradition of the "Jesus Gift" -- but how they choose to use this gift of love is up to them. 

I hope this story of our Christmas tradition will warm your heart, and give you a chance to invite Jesus into your Christmas celebration too.

Warmest wishes for a very Merry Christmas! 
God Bless -- Lisa

Saturday, December 1, 2012

Wintertime Paris Tag

Just sneaking in under the wire for Tim Holtz' 12 Tags of 2012, for November. I bet you didn't think I could do it.  lol.   I've been remembering back to the time we went with some of our Aussie friends to Paris for New Year's 2003.  We ended up at Versailles  while it was snowing and had such fun building a snowman!  I've got a picture around here somewhere...I'll have to dig it up sometime and add it to this post.  It was very surreal...building a snowman at Versailles -- such wonderful memories.

Anyway...on to my tag!  I used a variety of TH stamps from Shabby French, Winter Sketchbook, & Sketch stamp sets, then hand-wrote the sentiment, "Dreamin' of Wintertime in Paris."  I used some mini Christmas tree pearls to tie onto the tag, and added extra clear embossing on the edges & on the snowflakes, and some dusting of stickles as well.  The chandelier lights are tiny swarovski crystals.  My colors of choice were Broken China & Peeled Paint Distress Stains, and Chipped Sapphire distress ink. 

By the way...I didn't have a craft iron like Tim had in his post, so I turned my tag upside down on a piece of newsprint paper and used my heat gun to heat up the embossing powder while I used a brayer to flatten the tag onto the newprint.  It took a bit more time than ironing would've done, but it still worked!  Check out his post for all the details!

Finished it off with a gorgeous facet gem...and now...I think I'll call it a night.  =)


Keep Dreamin'!  Lisa