Monday, March 26, 2012

Marking A New Path -- A Little Outside the Lines

Today was Day 6 of Tim Holtz Creative Chemistry class and we got to delve into Distress Markers.  I love them...I only wish I had more.  =)  But I have enough to play with and that keeps me happy.  As always, it doesn't matter how much you think you know about a product or a technique, there's always something new to learn.  I'm absolutely loving these classes.  AND I found out that you can still take the class anytime this year as all the material will be recorded and the class members have lifetime access to it.  Pretty cool since there's a lot of information, including detailed PDF's.  If you're interested in the class you can check it out HERE

I chose to work with this awesome stamp set by Our Daily Bread designs to honor my husband.  He's in his 21st year with the Air Force and decisions about the not to distant future weigh constantly on our mind -- lots to think about. 

The three stamped images represent 1st, 2nd, & 3rd generation stamping (in order as above).  The first two were stamped on Specialty Stamping paper by Ranger (definitely love this cardstock), and the 3rd generation was stamped on watercolor paper.  The Distress Markers I used were:  faded jeans, peeled paint, pumice stone, tea dye.  The sentiments were stamped with black Archival.

 For my "practice" variations, based on a variety of techniques, I used the shell stamp by Stampin Up.  The first tag being on watercolor paper, and the second on the specialty stamping paper.  You can definitely tell a difference in the effects of the two papers.  But please don't judge me too harshly on my practice tags, as I'm still...umm, practicing.

So here's a bit more of me playing around with the Hero Arts/Sizzix Butterfly stamp & cut set.  I created these about a week prior to class starting and I LOVE the color combination of the Peeled Paint & Faded Jeans markers.  These are just stamped onto plain white cardstock.  And now for the new technique I picked up on the fly while playing around....ready for it??


 I inked my stamp with the markers, spritz a light misting of Ranger's water-based stamp cleaner (bubble gum scented) onto the stamp, then stamped it on the plain white cardstock & heat dried it.  It's really a cool muted effect with a twist...it has a faux embossed feel to it when dry!  I love it...it's different.  And here's a really cool idea...now Mr. Tim Holtz has something he can do with Ranger's stamp cleaner!  =D 

Take time to create something a little outside of the lines, you just might discover something new.
Thanks for checking in...Lisa

Sunday, March 25, 2012

Making a Distress Color Swatch Book - Revisited

Distress Ink Swatch Book
I originally posted this book in February last year (you can see the original post HERE), but there were no clear directions until now.  =)  In addition, I've added more of the Tim Holtz Distress line of products to this same booklet:  re-inkers, stains, markers, crackle paint, stickles, & embossing powder.  Yep...all in this one, little, handy-dandy, 4x4 booklet!

Finally, here are the written directions.  And for further clarification, you can check out my YouTube video below...or HERE, if you aren't able to see it in this post.

Making a Distress Swatch Book

-        Cut cardstock (CS)  8” x 12” \\ Score on the vertical (8”) side @ 4”  \\ Score on the horizontal (12”) side at 4” & 8”

-        With CS vertical, cut on the center score line from top edge to 1st horizontal score line.  Rotate CS 180 degrees and repeat.  (DO NOT CUT INTO CENTER SECTION)

-        With CS vertical, fold top of CS on first horizontal score line toward center.

-        Trim 1/16” off bottom unfolded edge.  Then fold bottom of CS on nearest horizontal line (2nd from top) up toward the center.

-        Fold left side of CS booklet around to the backside, so that the right side of the cardstock booklet becomes the front cover.

-        Print a swatch sheet from Ranger’s website - HERE (click on the product, then download the swatch chart PDF.

(I recommend printing onto brochure paper or matte coated paper (something thicker than copy paper). 

-        Cut swatch sheet as desired to fit into sections of swatch book.  Cut title of swatch sheet for front of swatch book.

-          Embellish as desired.

Swatch Book for Liquid Pearls & Paint Dabbers
To fill this book up with color is on my list of Wants!  =)

I hope you guys enjoy the video -- I'm still trying to learn the best way to film without wearing my husband's arm out too quickly. =)  I try to fit a lot in on this video as quick as I can, but it's still a ten minute video.  Hopefully you'll find the information useful. 


Remember that you can customize these books to fit your taste.   The book is quick to make -- it's adding your colors that might take a bit more time.  

Thanks for popping in!  Lisa

Creative Chemistry Days 4 & 5

I've really been loving taking Tim Holtz online course, Creative Chemistry 101.  I can't get over how much I am Still learning!  I thought I'd show the tags I made for Days 4 & 5 based on techniques we've learned.  It's a two week course, and I'm so excited to start another round of classes starting tomorrow.   Online Card Classes has a wide variety of online classes which you can check out -- I've been really impressed with their site so far.

 DAY 4 - (tags, left to right)

Tag 1 - Stampabilities, See the World stamp.  I was inspired to show one of the first stamps I bought which fueled my desire to start stamping.
Tag 2 - Dylusions Luscious Leaves (5x8) stencil
Tag 3 - Tim Holtz Winter Sketchbook stamp set (never too early to start on cards & tags)


DAY 5

Tag 1 - TH Air Travel stamp set & TH wildflower stamp
Tag 2 - TH Letters to Santa stamp set & TH bird stamp (can you tell some of my writing is upside down?  oops)
Tag 3 - TH Umbrella Man stamp & TH retro stamps

Thanks for checking in today.  Embrace the ink!  Lisa

Thursday, March 22, 2012

Distress Marker Quick Tip Video

Hello friends.  I made a quick video today showing a couple simple tips:  keeping your Distress Markers fresh longer, and showing how I label mine.  I've been teaching Distress Marker techniques at our LSS and I'll be sharing some of my ideas on my blog as well.  There is SO much you can do with these lovely markers, and in teaching a two hour class it's just not enough time to cover it all.  I created a four page handout for my students and that only covered some of the basics plus a few tricks I came up with just from playing around.

There are 36 markers that match the Tim Holtz Distress Ink colors, plus a white opaque Picket Fence as well (37 markers total).  If you're just getting started with the Distress Markers and aren't buying the complete set, I recommend starting off with Black Soot, Picket Fence, and 2-3 other colors you would use that blend nicely together.  My favorite combination, at the moment, is Faded Jeans & Peeled Paint...with a touch of Worn Lipstick.  Yeah, I'm not sure how the Worn Lipstick fits in there either, but I just love those colors.  =)

If you're new to the Distress Markers, Noell Hyman at Paperclipping.com has a great video with Tim Holtz demonstrating his new Distress Markers at CHA Winter 2012.  You can watch it HEREScraptime has a video with Tim demonstrating at CHA as well, which you can view HERE.


Thanks for stopping by, Lisa

Wednesday, March 21, 2012

It's From Her Treasure

My Treasure Stash!

I love the german scrap!

Not too long ago my fellow tea drinker, friend, and blogger bud, Gerri (It's All Treasure) sent out some lovely packages of mixed media goodies to see what others would come up with from her stash of treasures. I was blessed to received some of those treasures, and was anxious to play. We only had to use a few of the items, but I got a bit carried away and used quite a lot. I ended up creating a tag booklet out of a manila folder...with lots of pockets to hold tags. =)


Blogger is being difficult and not letting post some of the photos of this project, but I'll have another post, hopefully this weekend, with a tutorial for making this booklet, and more photos.


The booklet first opens up to this 2 page spread.  The left & right side open outward to a 4 page spread, which is the photo Blogger isn't letting me post for some reason. 


More pockets for more tags!
I made the tassels on the tags from the metallic threads on the card from the stash.


This is the left side of the 4 page spread.  The lighting makes this page look pretty yellow for some reason, but its coloring is a closer comparison to the next photo.


And LOTS more pocket space.
The mini tags were actually black & white post-it notes.  I added some vintage color distress ink, stamped some flourishes, & matted them to black cardstock.


This is the right side of the 4 page spread.


With more tags, of course. 


There were several more photos I wasn't able to add due to a problem with Blogger, but hopefully you get the idea.  Make sure you take some time to stop over to Gerri's blog, "It's All Treasure", to see what the others made with their treasures.  And thank you for popping in to see mine!

Enjoy today!  Lisa


Class is in Session

I'm very excited to finally be able to take one of Tim Holtz' classes!  He's teaching an online course called Creative Chemistry 101, and it's already an amazing class.  I love that I'll have access to all the class info for a lifetime, including PDFs, videos, & more.  There may still time to jump in, as today is only Day 3, and you can work at your own pace.  For more information you can check it out on Tim's blog HERE, where you can watch a "preview" video and find a link for the class. 

Now onto my class contributions -- I created the following tags using a variety of techniques.  But it's so much more than just learning the techniques.  I'm actually learning the "Creative Chemistry" behind the scenes.  And LOVING it! 

Day 2

DI - Faded Jeans, Peeled Paint, Worn Lipstick, & Walnut Stain

DI - Pine Needles, Stormy Sky, Fired Brick, Peeled Paint, Faded Jeans,
Worn Lipstick, Rusty Hinge, Seedless Preserves, & Pumice Stone

DI - Seedless Preserves, Broken China, Evergreen Bough, Rusty Hinge,
Fired Brick, Dried Marigold, & Walnut Stain

Day 3 (one tag MIA...will catch back up with that one)

This one is my Favorite!
AI - Wild Plum, Caramel, Cloudy Blue, Lettuce, & Copper
and Archival Black
TH "On The Railroad" stamp set

Texture Trade - TH Umbrella Man
DI - Weathered Wood, & Stormy Sky
TH "Reflections" stamp set

Thank you for stopping by!  It's never too late to get inky...Lisa

Wednesday, February 29, 2012

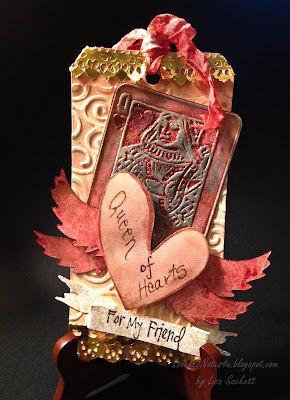
Queen of Hearts Tag

Happy Leap Day! 
It seems I've been away a lot this month -- but after taking my son for his college visit tomorrow I think we'll be able to stay home for a while. 

For this tag I'm joining in the fun with Tim Holtz' 12 Tags of 2012 challenge!  You have a month to create some "tagspiration" and I'm cutting it REALLY close.  I guess it's good for me that I had an extra day this year. 

My inspiration for this tag, aside from it being my friend's birthday, actually came from this past year's 12 Tags of Christmas (by Tim Holtz, of course).  His tag for day 12 utilized his deco strip die "Vintage Lace" to create a faux dresden paper lace/german scrap (for more info on dresden/german scrap click HERE).  I was so excited about it that I immediately went out and bought the die.  I had recently acquired several rolls of German foils and I got straight to work cutting out the "faux dresden". 


I got a bit carried away with my cutting of the colored foil, so I adhered them to blank paper with removable adhesive down the left & right sides of the paper. I gently pull them off the paper as needed, and they store flat very easily.


Another tip Tim Holtz passed along was to take adhere a strip of packing tape to the die and run it through the cutter prior to cutting paper.  It helps all those little pieces to come out SO much easier!  What a fantastic tip!


As most of you know, I love my Perfect Pearls -- and Sunflower Sparkle is my favorite!  Using an acrylic block I misted with water, I scooped some PP on my brush and added it to the water directly on the block.  I misted more water as needed to make it more of a wash and painted it over my queen.  I also should mention I used the same PP in a spray mix to spray the background before I started my tag, as well.  I used the Swirls embossing folder, inked with Tattered Rose distress ink, for the background of the tag before assembling it together.


Weathered Wood & Aged Mahogany distress inks were used on the queen, but after going over it with the Perfect Pearls it gave it a sort of Platinum look.  I also used Blush Perfect Pearls over Tattered Rose for the heart -- framing it with Forever Red & more Sunflower Sparkle PP.  =) 
For the background of the queen  I squeezed a blob of Barn Door distress stickles directly on the image and moved it around with my finger to fill in the crevices for an additional pop of glitz.  To finish it off, I used Fired Brick distress stain to color white seam binding ribbon and tied it off over the faux dresden.  The photos don't do it justice for all the shimmer it actually has.  =)

The products I used for this tag: 
Dies:  TH Tag & Bookplates, TH Tattered Banner  (thx Marjie), TH Heart Wings
Embossing Folders:  TH Swirls Texture Fade, TH Poker Face Texture Trades
Distress Inks:  Tattered Rose, Aged Mahogany, Weathered Wood
Distress Stains:  Weathered Wood, Fired Brick
Distress Stickles:  Barn Door
Perfect Pearls:  Sunflower Sparkle, Forever Red, Blush
"For My Friend" - Michael's $1 bin stamps
Hug Snug Seam Binding - White

Thanks for stopping by! Lisa

Tuesday, February 14, 2012

My Son's Origami Rose

Happy Valentines Day!  Our morning started out with heart-shaped Strawberry-Banana Pancakes, Strawberry Syrup, & Strawberry Milk.  Yum!  I met my hubby for lunch, and tonight will be heart-shaped pizzas -- my guys let me get away with it since it's a "romantic" holiday.  LOL

I wanted to share something my son made for his friend...who is a girl.  =)  He made an origami rose!  I am so proud of him.  He knew exactly what he wanted to do and he did it well.  I made the box to hold the rose & we tied it with ribbon for the presentation. 

Cody said he wanted "petal dust" for the rose -- I really didn't know what he meant.  But I did have some Perfect Pearls...so he compromised and used that instead.  He painted Blush Perfect Pearls on the white rose, and shadowed the green stem with Forever Green Perfect Pearls.  For the final burst of shimmer he sprayed Glimmer Mist "Pearl" over the entire rose.  It looked amazing!


 Not sure if you're able to see the shimmer on the photo, but it really looked great.  I made the box using 12 x 24" cardstock cut down to size, and used my Crafter's Companion Ultimate Box Shaper to make the box. 
 The rose was nestled in green tissue paper and fit perfectly.  I forgot to take a picture of the box wrapped with the bow, but we used a shimmered pink & silver ribbon to tie it up.  He left for school with the box, and a feeling of accomplishment.  I love that he decided to make this gift.  Can you tell?  ;-)  By the way, if you're wanting to make this rose, you can find directions for it on YouTube.


My guys each gave me red rose (3) w/balloon & bear, and we'll be having a lovely night together.  Can't forget the strawberry jello jiggler hearts -- add a dollop of cream and we'll call it a day!

I hope your day has been lovely too!  Lisa

A few more Cal Cards


I've been using more calendar pages to make cards -- "Cal Cards".  It's a great way to recycle, and they made great card sets for gift giving.  My last post repurposed a "Finish" dishwasher detergent box for the card box, and these are some of the cards I made to go inside -- using some leftover calendar pages with the date cut off.


Thanks for stopping by.  I've got a Valentine post going up a bit later this evening.  =)  Hope you're having a great Valentine's Day!  

Lisa

Thursday, February 9, 2012

Finish-ed Card Box

I'm finally posting my "Finish-ed" Card Box.  We ended up going out of town last week, and this week our dog, Hercules, has not been feeling well and needed constant supervision -- so time got away from me. 

I used an empty box of "Finish" diswasher detergent, cut off the top closure flaps, and made a cover box out of cardstock by tracing around the perimeter of the box. 

Because most commercial boxes have a coated finish on them, I used sand paper to scruff up the coating to give the box some "tooth" so my paint/paper would adhere securely.  I then added a coat of paint for extra durability, before adding deco cardstock -- I used Mariposa by DCWV. 


I adhered cardstock to the inside of the box to give it a finished look, then added cording around the bottom of the box to hide the layer of felt I added to protect surfaces from the roughness on the bottom of the box.

This picture shows the back of the box & the paper adhered to the inside.

I used decorative trim & buttons my Mom had given me years ago to secure the handle & the sides of the cover.  The sides of the actual box can be seen through the cover, as the cover is 6" x 12" cardstock.  I doubled the layers of cardstock for the box cover to give it additional stability, and sandwiched the ribbon between the two layers.  I continued the ribbon on the front of the cover for both a decorative element, and to add continuity.  The buttons were attached with The Ultimate Glue, after I snipped off the shanks. 


You could use this box for all sorts of great gifts, but I found that invitation sized cards (A2) fit perfectly (though the envelopes did have to be folded in half).  So that's what I'm using this one for.  And it's already designated for somebody's birthday.   =)


I'll try to get back this weekend to show these Cal Cards a bit more closely.  Isn't it a wonder some times what you can do to repurpose something that was originally meant for the trash bin?!  =) 

Thanks for stopping by today --
Lisa