Close to My Heart (CTMH) stamps! I'm not strictly a stamper girl, in fact, I just enjoy dabbling in a lot of different mediums--so you won't always see stamping in my projects. But I'm a romantic at heart, and actually it was the name of the company that first caught my eye several years ago. Since we're a military family I had never had the desire to stock up on a lot of wood blocked stamps--their bulkiness & weight is something I have to consider each time we relocate to another place. But when I found these CTMH acrylic stamps I loved that they were prepackaged in envelopes that solved the easy & lightweight storage issue. In saying that, I am not a consultant so this isn't really a sales pitch but just a preface to this post really--
I started going to Hostess Club meetings for CTMH a few years ago with some friends and this paper folding technique is something I learned from the consultant, Johanna. It's an easy process and you can recycle scraps of paper to make it! You'll need four squares of decorative paper (I like mine two-sided) in varied sizes: (squared) 3", 2 1/2", 2", and 1 1/2". You can use any sizes as long as they vary by 1/2" each--these sizes fit perfectly on an standard A2 card (1/2 sheet of 8 1/2" x 11", folded in half--or 5 1/2" x 4 1/4" card).
You'll fold each square as indicated in the picture above following the steps making sure to firmly press each fold line: 1. pick which side you want to show and fold in half diagonally, 2. open it up and fold it again on the opposite diagonal. 3. open it up, flip to other side, and fold in half -- straight edges together. 4. with opposite side facing up and in a tent-like position, press down on center with finger and you should be able to fold into a flattened triangle on the previous fold lines. 5. with it laying flat in front of you (straight edge on bottom), take the top section, right straight edge of the triangle and fold it, on front, the right edge to the center of the triangle--do this to the left side as well, folding it over so the left edge of the triangle is even with the right edge, in the CENTER of the triangle--press down firmly. Do this with each of the four squares. 6. Nest the folded triangle together (large on bottom, to smallest on top). Put a glue dot, or dab of glue on the back top of the three largest triangles to secure.
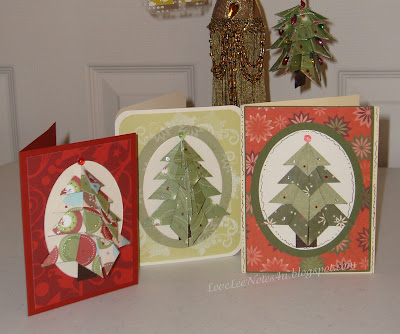
 I used brown scraps for the tree trunk and mounted the tree to an oval cutout before mounting it to my card. I also made it into an ornament by putting two completed trees together, sandwiching a metallic cord hanger between the two trees. In retrospect, I think I would've liked the ornament even better with three sides as opposed to the two--but you can play around with it for different options. I added some miniature tree lights and stickles to the ornament, and stickles & a bauble tree topper for the trees on the cards. Just a note: If you use scrapbook paper instead of cardstock, it will lay lighter & flatter for mailing out...if you use cardstock it will be more dimensional and will pop out of you card a bit more. And I found the cardstock worked better for the ornament, and they even look great on banners as well.
If you have any problems with this technique, please let me know. I'm hoping to start posting videos after the first of the new year--that should be interesting. =)
Happy Crafting,
Lisa


No comments:
Post a Comment
Thank you for your LoveLee Comments!