Monday, May 2, 2011

Blogaversary Candy Day2

It's come around to the one year mark for my blog and I'm celebrating by giving away some blog candy!  If you haven't read Day 1's post (probably because I posted it rather late last night) you can read it HERE to get the details on how to be entered into the drawing.  Today in your comment I'm asking: What pets are part of your family?--and if you don't have any, then what would you say is your favorite animal? 

Hercules

Lucky

They love each other!
I have two dogs--toy poodles named Hercules (boy), and Lucky (girl).  We got Herc when he was about six weeks old at a Pet Store--but we actually rescued him, as he needed hip surgery and they were going to put him down.  We got the surgery and he is the most loving dog...LOVE people, and LOVES licking!  We have a sign for our front door that says "Beware, dog can't hold his licker!"  No joke...he really can't.  We've only had Lucky about a year and a half, but our dogs have known each other most of their lives.  Lucky was rescued by my sister, who nearly hit her while out driving one day--hence the name, "Lucky".  When my sister moved they weren't able to take her with them, so we eventually ended up taking her in.  She's been wonderful for Hercules who is fast losing his hearing. Together our dogs weigh 20 lbs total.  Ha ha...  Herc's an AKC registered phantom toy poodle under the name, "Sackett's Mighty Hercules", and Lucky has a mix of toy poodle and something else we're unsure of. But we've been very blessed to have them as a part of our family!

Today's blog candy is Tim Holtz Distress Ink in Spiced Marmalade!  You can check out a bit more information on it HERE--you can also search my blog for more Distress Ink projects.  

Guess I better go for now--Lucky's not feeling well today, so we're off to the vet for some meds. 

Have a wonderful day!  Lisa

Sunday, May 1, 2011

It's my 1 year Blogaversary!

I can't believe it's actually been a year since I started this blog!  My first post was April 28, 2010, where I start by telling the "blog world" a bit about myself.  You can read that post HERE.  My first project I posted was when I used Tim Holtz Ornate Plates to make bookmarks--posted on May 6, 2010.  From there, I just blogged by trial & error--changing my layouts, adding/taking away designs, adding it back...and constantly trying to figure out "blog etiquette"...still.  I also found myself trying to figure out what others were writing when they used acronyms, so I  figured out how to makes other pages for my blog and added a page for "Blog Acronyms".  I figured if I was having trouble following blogs because I didn't know what they were saying, then maybe there were others that didn't know either.  I added other blog links (LoveLee Links) to another page so my Home page wasn't too busy, but there are so many blogs I like to visit now and I haven't had time to update my links like I'm wanting to--if you want to see who I like to "Follow" check out my Profile Page.  It's all still a work in progress, but the journey has been fun so far, and I'm making new friends all the time. 

In celebration of my first year of blogging, I decided to share some Blog Candy!  I'll show a single photo each day for a week (8 different candy offerings), ending on May 8, 2011.  On May 9th, I'll divide the candy offerings into two lots of four -- I'll be using a randomizer to pick TWO winners (since I'm going into my 2nd year).  These two winners will not only receive the four items in their candy lot, but I'll also have some surprises in there as well!  I love surprises--and I hope you will too.  The first winner will have their choice of the two candy lots.  The winners will have until midnight CST May 11, 2011 to contact me via email with their postal address.  If I haven't heard from the winners by then, I'll draw another winner. 

Okay...so here's what you need to do to be entered into the drawing:  start by leaving me a comment on this blog post answering the question "What is your favorite flavor of tea (hot or cold)?"  (if you don't like tea, tell me your favorite hot drink).  You can add another "drawing entry" each day by posting a comment on the blog candy post for that day--make sure you answer the "comment" question for each blog post.  For my subscription blog readers, and for my blog readers in Creating the Hive, click HERE to enter your comment for your drawing entry.

BONUS ENTRY -- You do not have to be "Follower" of mine to win, BUT if you are already a follower (or become a follower), let me know in your comments.  Each day, through May 8th, that you leave me a comment (as a follower) you'll get an extra entry--that could be up to 16 drawing entries!

NOTE--you can post your comments on any of the blog candy posts on any day from May 1-8, 2011 for a chance to win.  This one will be posting late in the evening, so many won't see this post until May 2nd. 

Today's blog candy is The Ultimate, by Crafter's Pick!  Click the link to find out more about this glue.  I personally love it!  I've used it for all sorts of papercrafting projects including cardmaking, scrapbooking, book making, and much more. 

So let the fun begin!!
Best of luck to you all...Lisa

(I'm not reimbursed by any company for the products I'll be giving away, I just wanted to thank you--my blog readers--for celebrating with me this first year.)

Friday, April 29, 2011

A Card In Honor of the Royal Wedding


Did you watch the Royal Wedding?  (If  you haven't there's just a bit of a spoiler alert here in this paragraph) Prince William & Kate Middleton are now the new Duke & Duchess of Cambridge!  I didn't get up at 3am to watch, but I did set my DVR.  I'll have to play back later to watch their vows, as I came in when they were coming down the aisle.  But after seeing their "double" kiss on the balcony at Buckingham Palace (the sweetest thing!) I just wanted to post my Congratulations to the Royally Happy Couple!  I remember watching Prince Charles & Princess Diana's wedding, but this one has to be my favorite so far...LOL.

Anyway--I made this card a while back (long while back), but I thought you'd be interested to know that I used a gold foil chocolate candy wrapper for the mat, which I used a border punch on.  The flowered overlay is from some beautiful wrapping paper that I just loved, and the sentiment is a sticker.  But isn't this sentiment just Perfect for this new married couple?!  Which, of course, is why I chose this card to highlight today, even though it's not as "weddingish" (yeah, I know...not really a word).  =)  I cut two corner punches from the lavender cardbase and added a touch of dark purple ink to the cut out corners to finish it off. 

The camera I used when I first made the card and took the photo wasn't that great, so I apologize the coloring is not better. 

Thanks for stopping by today -- keep an eye out this weekend for some blog candy, as I'll be celebrating my one year Blogaversary!  =)
Lisa

Tuesday, April 26, 2011

Sip n' Tip Tuesday - New Dimensions

Today I'm having a delicious afternoon tea that a friend sent me -- Sweet Ginger Peach tea made by Revolution Tea.  We did a lot of traveling this weekend to spend Easter with my in-laws (which was lovely), but I've been feeling a bit under the weather today and ginger tea always seems to help settle my stomach. 

I have another great tip today in regards to giving your project some new dimension with repurposed materials.  Usually when we want to add depth/dimension to a papercrafting project we would add pop dots, foam squares, or mounting tape to the underside of our papers/embellishments to pop them up. These can be acquired pretty inexpensively these days--for instance, at a local $1 store.  However, my tip today is to save you some pocket change by using what you already have at home.  Try some of these ideas for some no cost, but effective ways of adding dimension to your cards, scrapbooks, or other papercrafting projects you might have:

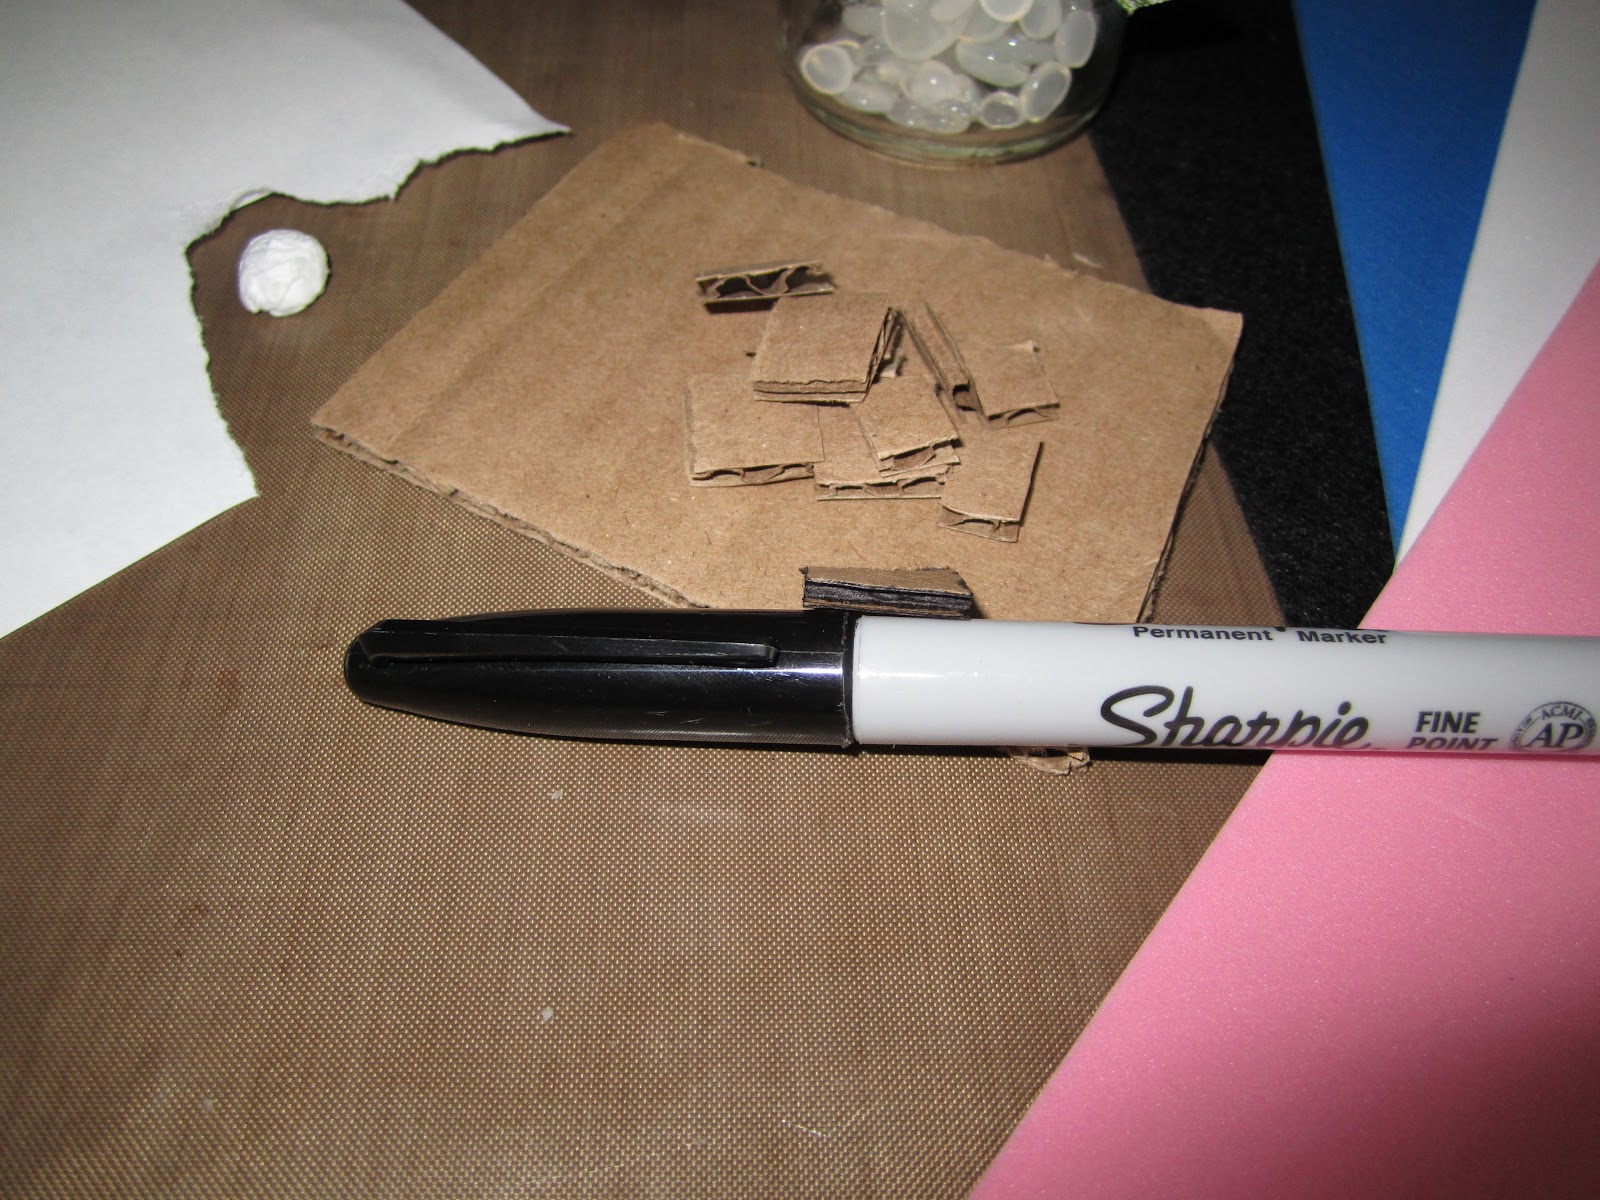
1. Cut corrugated cardboard boxes (or shipping boxes) into small squares, based on your project size (you can also use a hole punch or circle/square punch to cut your cardboard if it fits in your punch--but I found sissors to be much faster/easier to use).  Take a black permanent marker and color the sides of the cardboard to "camouflage" it when using in your work.  Adhere the cardboard with glue stick or a wet glue to your project to pop an image/text.  Double stack the cardboard squares (use a wet glue to sandwich the cardboard together) to add even another layer of dimension. 

2. Use your hot glue gun to make small glue dots onto a silicone pad (craft mat, baking sheet, etc.), and let cool completely.  Once cooled they will be solid and ready to use -- simply place the glue dot on your silicone pad or craft mat and hold a heat gun over the top until the cloudiness of the glue starts to clear (about 7 seconds) then press your cardstock onto the glue dot.  Turn your cardstock over and heat the other side of the glue dot again and add your embellishment onto dot when it starts to become clear.  Don't leave the heat gun over the glue dot longer than 10 seconds or it may completely melt your glue.  Store your homemade glue dots in a baby food jar or other recycled container until you're ready to use them. 


3. Take a small section of printer paper, or other lightweight paper, and scrunch up into a 1/4" - 1/2" ball.  Add a wet glue to the ball and work in with your fingers until sticky but not soaked.  Press onto your paper project with a craft stick (or popcycle stick) and add your top paper layer you want "popped", pressing down slightly.  Leave set to dry 5-10 minutes.

4. Kid's Fun Foam comes in a variety of colors which you can cut up just like the cardboard and use to color coordinate with your project, so it will blend into the background without having to color the sides with permanent pen.  I have found that a strong adhesive (such as Scor-tape, The Ultimate glue, or Glossy Accents) works best in adhering this type of mounting foam to your project.  If you're double stacking the foam for extra depth, use a hot glue gun to adhere the pieces together--this helps to "melt" the foam together and keeps it from separating.  When the hot glue cools, you can trim off any overflow from the edges before adhering to your project.

5. You can use the styrofoam from the packaged meats at the grocery store much in the same way as the cardboard above -- just make sure it's well sanitized first.  Use an emery board to sand off the finish of the smooth styrofoam packaging to give it some tooth--apply to project with a wet glue or strong dry adhesive.

Have a look around your home, you just might discover something old you can "re-new" again.

Happy Crafting!
Lisa

Wednesday, April 20, 2011

Adhesive for the Tool Box - GM4

It's Grungy Monday #4 - and a box of adhesive for Hubby
I missed last week's Grungy Monday technique because I currently don't have any Color Wash--but when I do, I'll give that technique a try.  For this week's Grungy Monday, Linda at Studio L3 has us working with Tim Holtz Texture Fades & Distress ink.  You can find the video HERE. 


I actually used TH new Texture Trades (Artful Muse set), which are ATC size, with walnut stain Distress ink for my tag.  I also used TH new stamp set (Reflections), which I've been wanting to use for a while--and I love it! 

I've been telling my DH I would make him a box for his MacBond adhesive...and I finally did!  I used TH Lost & Found paper stash for the box and cut out a border strip from the same paper as a box band.  The tag easily slips into the band, and stores into his tool box.  I used the two techniques on the tag on opposite sides (as shown by Tim in his video), and used one side for the title and the other side for the product info site.  

oops--please excuse the messy writing,
at least this is the back-side. lol
Guess I better go get a few more things crossed off my list.  Have a great day!   Lisa

Bland to Grungy Grand iPad Jacket

From bland...
I finally got tired of looking at my bland, black iPad jacket and decided to give it a bit of life.  My DH says he likes it because it tells a story, but when I offered to do one for his he promptly informed me that he likes his plain black jacket just the way it is.  Okay then, so I'll just show you mine. 

...to Grungy Grand!
I used Tim Holtz Lost & Found paper stash cut to fit within the creased sections.  The inCase jacket converts into an easel for better viewing, so I didn't add any dimensionals to the vintage style papers I used.  Instead I stamped some silhouette images and phrases, added a couple stickers, and finished with a touch of Distress ink.  It really was quite simple to make, but I'm very pleased with the outcome. 

I adhered the finished cardstock (CS) to the jacket with Scor-tape, and it holds it very well.  Later down the road if I want to change the look again, I'll just remove it and add another.  And if you're wondering how I'll remove the CS without tearing it up, check out my recent Sip n' Tip Tuesday tutorial (of course I'd remove the cover from the iPad before starting the removal process).

That was a pretty quick post for my most recent "Re-do".  Whatcha think? 

As always, thanks for stopping by.
Happy Crafting!  Lisa

Tuesday, April 19, 2011

Sip n' Tip Tuesday - Removing Dry Adhesive from Paper

some examples of dry adhesives
Welcome to my first ever Sip n' Tip Tuesday tutorial -- where you can sip your tea, while checking out my tip of the week.  This week I'm starting with my most favorite papercrafting tip EVER -- how to remove strong dry adhesive from your paper once you've stuck it down, without ripping your paper.  Oh yeah! 

One of my pet peeves when I'm crafting is when I adhere paper together with a strong dry adhesive (I usually use Scor-Tape) and realize I've gotten it crooked, or put it in the wrong place.  If you try to pull it apart the paper just rips and you've gotta start over--how annoying is that?!  A couple years ago I was assembling kits for one of my classes that had a lot of moving parts.  I had a variety of samples I was using, and for one sample in particular I had just used the last of my paper--and yes, I made a mistake when I adhered it together...upside down.  I happened to have my heat gun out, as I was using it for embossing, so on a whim I decided to try to heat the glue through the cardstock and it worked like a charm!  No ripped paper, and when I reattached it to the project correctly, I only had to flatten it back down with the original adhesive and no one was the wiser.

So here's how it works -- starting at the edge of the paper you need released, hold the heat gun to the paper as you would if you were embossing.  Don't keep in in one place for too long, then gently pry apart the paper.  If you are lifting edges the paper will be HOT.  Use tweezers to pull the paper apart to start.  If you can anchor down the bottom paper (or have a friend help), gently pull away the top paper while heating so you can pull it apart continuously, otherwise heat only a small section at time and pull away only the section that still retains the heat.  Once the paper cools it WILL rip, so take your time.  If you have a large section you're heating or even a small bitty section your trying to remove, it's takes a bit of finesse to do it yourself--it will help if you slide a release sheet (paper that the stickers have been removed will work) between the sections already pulled so if you drop the top paper the adhesive won't reattach itself. 

Remember, I'm using my other hand to take the photo.  =)
What I've found so far that this method will remove:  Scor-Tape, Ranger Wonder Tape (or other red line double stick tape), ATG (Advanced Tape Glider) Adhesive, Tombo Adhesive, or any other permanent dry adhesive, glue dots, stickers, foam pop dots (the foam will melt if you're not careful, only minimal heat needed to remove), and certain packaging can be opened with your heat gun by heating the glue (since some packaging glues may emit toxic fumes, please use extreme caution if using this method -- if you're unsure, don't do it). 
If you find other things that the heat gun works in removing, please make sure to add your comment so we can keep this updated.  I welcome all your comments.

Enjoy your cuppa!
Lisa 

Friday, April 15, 2011

Heading Towards New Horizons


 Retirement--the next step towards a new adventure!  This card was for a military friend of ours doing just that -- heading toward new horizons.

Using my Independence Day cricut cartridge I made the pennant banner for this card.  I didn't even realize the pennant cut was on this cartridge, so that's a bonus which can be used for a lot of other projects!  I stamped the background with Stampin Up's large denim stamp & faded jeans distress ink.  Then I used Tim Holtz new stamp set, Air Travel, to stamp the plane and heat embossed it with Zing black embossing powder.  Finally I stamped the "Time is a Companion" quote (also by TH), and added a ribbon to complete the card.  I love that quote--and thought it worked well for this retirement card.  Simple, but I like how it turned out.

For the inside of the card, I just blended in more ink leaving patches of white, for a sort of clouded effect, and stamped a bit more using "The Lord Bless" Wordsworth stamp, and stamps made for "Operation Hero Mail".  At the writing of this post, the Hero Mail stamps are on sale right now for $5.00 ---> HERE. 

It doesn't take a special day to say 'Thank You' to our military members for their service, any day will do just fine.  Consider sending a card today in support of Operation Write Home.

Guess that's about it for today.  Thanks for checking in.
Happy Crafting!  Lisa

Thursday, April 14, 2011

Mister Zagg

I love Ranger's Mini Misters!  They're great for so many things (we'll get back to that), and I think they're fairly inexpensive as well--a nice bonus.  But you'd be surprised at what you might have around the house worth repurposing.  We recently bought our son a new phone; and everytime we buy a new phone we always buy the Zagg Invisible Shield for it's guaranteed protection.  But this is the first time I'd noticed that there is a small mister in each kit--no kidding!  These misters have a solution in them to help apply the screen cover, but is easily washed out and perfectly usable--and the labels peel right off too.  I dug out another of our kits we had put up, and grabbed the mister out of that one too.  One of the misters is the exact size of Ranger's Mini Mister, and the other was a tad bit larger.  But how cool is that?!  Had to pass on that bit of useful repurposing to you all, of course.

Getting back to why these misters are so fab:
1.  Small size to go anywhere/anytime, for all your crafting needs
2.  Delivers a fine mist, so heavy droplets don't weigh down your project in just one area.
3.  Fill the bottle with so many fun things -- great for lots of applications:
     - Fill mister with water, apply dye ink to stamp, mist inked stamp with water and press image onto cardstock for a watercolor print.
     - Fill mister 2/3's with water, add 4-5 drops of re-inker, spray over project a little or a lot--depending on the color coverage you like, let dry naturally or dry faster with heat gun
     - Great for distressing projects with a bit of water mist, scrunched up paper, and drying time
     - Fill with stamp cleaner to clean up stamps, dry on soft cloth/towel
     - Fill with walnut stain
     - Fill with Copic blending solution for your alcohol ink projects
4.  Use as a water mister when a bit of steaming is necessary for your small fabric projects

And SO much more!  You can google lots of information on how to use these misters, or check out YouTube for more project ideas.  Tim Holtz has a lot of videos I like watching for inspiration...try checking out some of those on YouTube for your inspiration (he uses the Mini Misters in a lot of his projects).  Here's a video to get your creative juices flowing...Tim Holtz Distress Ink & Mini Misters...Enjoy!

ETA - Best Buy (local electronics store) installs a lot of the Zagg film onto gadgets for their customers, which means they go through these misters very quickly.  I asked them what they do with them, and they said they throw them away!!  Whenever I'm in there, I ask if they have any emptys.  If they do, they give them to me.  Sometimes they'll combine misters that are low together, and give me the empty bottles.  Just thought you might be interested!

 
Happy Crafting!  Lisa

Wednesday, April 13, 2011

Cats & Nursery Rhymes

A bit of playful fun - Cat & the Fiddle - for Hannah
I know I've been behind blogging this week -- I've been working on a Mother-Daughter Tea for our church.  I'll post the specifics for the projects, and pictures, once the event is completed in May--I wouldn't want to spoil the surprise for anyone.  But just as a teaser I can tell you we named our tea time "A Supercalifragilistic Proper English Tea".  =)

In the meantime, I thought I'd share a quick card I made for my friend's daughter, Hannah.  They have some fun cats in their family--we used to watch them bounce off walls & shelves, and laugh at the funny things these cats would come up with.  So I had to include a cat in my birthday card! 

I absolutely LOVE the Nursery Rhymes cricut cartridge!  Even though my kids are older, I just couldn't resist all the great cut files for this cartridge.  I'm sure I'll find lots of ways to put this cartridge to use.  As for this card:  I used my Cricut to cut the Cat & Fiddle figure from a spice color cardstock (CS), and cut the base shadow blackout using a darker brown CS.  I inked the edges of the detailed cut with vintage photo distress ink, adding extra for the fiddle area.  Then I used Glossy Accents over the fiddle to give it a polished look (it's not easy to see in this photo unfortunately), and tied a ribbon around the cat's neck, before adhering it to the shadow base.  I used a white pigment ink to lightly dust around the edges of the dark brown CS. 

My CS base is Best Creations CS (I believe--it was in my stash), and I added a strip of magenta CS to break up the design a bit...also adding more white pigment ink, after distressing it's edges.  I added a bright pink May Arts ribbon, and a glittery "H" to finish the front of the card.  On the inside I cut phrase "Cat & The Fiddle", inked it with a bit of vintage photo, and applied diamond stickles for a bit of a sparkle effect.  I didn't cut the shadow for the phrase, as I wanted it to sort of blend into the card a bit. 

I probably don't use my Cricut often enough for card making, but I need to.  I couldn't believe how quickly this card came together  -- good thing too...I was already belated as it was!

Thanks for stopping by!  Lisa