Saturday, October 30, 2010

Creativity Inspired by God's Creation - Cricut Circle Monthly Challenge

I don't scrapbook as often as I should--case in point...my hubby and I went on a cruise to Alaska in May with some close friends of ours and this is the first page I've completed.  The entire trip was so amazing, that I knew I'd want to spend some quality time on my layouts to give the pictures their due.  For me, photos are limited in capturing the euphoric feeling you get when you see humpback whales surfacing one after another in the same body of water we happen to be occupying together at that exact moment.  The glaciers, the snow glazed mountains, and bright blue sea...God's perfect backdrop for a mesmorizing event in our lives which inspired this particular scrapbook page in which I focused on the whales--up close and personal.

With my Gpysy, I used the Font shadow feature from the Winter Woodland cart to cut a 12x12 page of phrases I wrote.  I removed all the letters, plus two shapes cut from Life's A Beach cart (anchor & ship), which left me with a quickie stencil. 

I used removeable painter's tape to attach it to a metallic blue-green patterned paper distributed by Royal Caribbean Cruise Lines (RCCL), and inked the letter spaces with Broken China Distress Ink.  With the stencil still in place, I lightly sprinkled Zing White embossing powder sporatically over the entire project and zapped it with a heat gun before using a fine point black marker to lightly edge the title.

I then used Straight From the Nest cart to cut 8 Flourishes (4 with the shadow feature) out of S.E.I Christmas Mint, Meringue paper.  This paper was great--it was designed w/embossed flourishes on the paper, so I used a foam applicator to add the same ink to the flourishes cut with the shadow feature, leaving the other four the shiny off white.  I used off white photo corners, and finished framing out the pictures with the flourishes.  Then added a bit of blue rhinestones to some of the waves framing the photo, and half pearls to some of the waves below.  I love how the flourishes resemble the white wash of the water as the whales capered by. 

For my charm--I wanted to highlight the backdrop as all encompassing, so I printed out a photo on brochure paper (48 lb) and used Diamond Glaze to attach it to a TH Ideology Facet.  I attached a jump ring, and blue velvet ribbon.  I used a die cut frame I had in my scraps bin that didn't match my colors, so I inked it with VersaMark and heat embossed it with Zing White Embossing powder.  I used the cellophane packaging from my pearls package and attached it behind frame, under the charm, added some bling and "Inspired by God's Creation".  If you look at the reflection of the cellophane packaging in various lighting it looks like the sun reflecting off the water, and the blue velvet ribbon is fashioned to look like the tail of the whale.  I just thought that was a bit of fun to add to the page--things you don't always see on first glance.  I finished off my page with journaling on metallic vellum, a "Journey..." sticker embellishment, and photo corners on the 12x12.  

Not only was this was a fun way to be creative, but it has inspired me to work on the rest of our cruise photos--so stay tuned for more pages in future posts (although, notice I didn't give an exact "future" date for those--ha ha).  Thank you for stopping by and having a look...and since you're already here, grab a cuppa and hang out a while--I won't mind a'tol!  =)

Wednesday, October 27, 2010

Maggie Cards & a bit about Vellum Paper

A quick repurposed card can be made from a magazine, catalog, or any free unsolicited materials you might otherwise throw out--I like to call them my maggie cards.  Here's an Anniversary Card I made from an Art catalog I received in the mail.  An important tip to remember: while these cards are great to make and send to family & friends, don't try to sell them; copyright laws are in place to protect the original creators, and fines can be quite hefty.  For my card, I cut out the image and adhered it to the front of an 8 1/2" x 5 1/2" piece of CS (cardstock), folded in half.  Then I embellished it with vellum paper, brads, & ribbon  (if you're not familiar with vellum, check out this website for more information --> HERE). 
Before embellishing - cardstock & "maggie" print

After adding embellishments: vellum, ribbon, & brads

Quick Maggie Card - cardstock, "maggie" print, vellum & brads

Vellum paper is mostly transparent, comes in a variety of colors (though clear is the most common), and is great for embellishing so many projects--I like to create word documents with phrases, sayings, & quotes, then print it out on vellum; you could also print out color photos, drawings, & more.  It feeds in your printer as easily as paper, BUT it takes a longer time to dry.  I like to print mine out in the evenings for a project the following day; then I know it's had plenty of time to dry.  In a previous post, Masks of the Manor, you can see in the top mask's eyes that I used vellum printed with colored images. 

Because vellum is typically fairly transparent, certain adhesives can be seen through it--so I like to use brads or eyelets to fasten it down to paper most of the time.  There is a vellum adhesive you can purchase that shows less of the glue but I think it's pricey, and isn't perfectly transparent.  So here are a couple other ideas to fasten the vellum to your work:  1. use a glue dot in strategic places and then cover that part up with an embellishment; 2. use a glue stick over the entire back of the vellum then burnish it in place (pressing down evenly) with a bone folder, or popcicle stick, removing any excess glue; 3. use staples--small ones criss-crossed, large ones, fancy ones, colored ones...any ones.  =)

To get the "stained glass" effect, or a more vivid look to your vellum, print your vellum with  an image outline (I call this a "hollow" image--something you can color in). When the printer ink is dry, turn the vellum over on its backside and color inside the lines with marker.  Once the marker ink is dry, turn it over and attach to your project.  If you're not inclined to print your own vellum, you can also find booklets of vellum quotes/sayings, vellum stickers, embossed vellum, colored vellum & more in any craft store.

So that's just a "bit" about vellum.  If you know some other tips/tricks about using vellum, please leave a comment so others can have fun using it too. 

Have a LoveLee day!
Thursday, October 21, 2010

Smooth as Suede

snow drifts made with paper suede

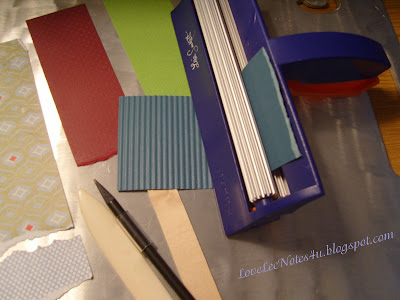
Paper Sueding has been around a while, but you don't often hear about it.  It's simply a process that involves the breaking down of paper fibers which causes layers to peel, resulting in a suede-like texture.  You can buy suede paper at most scrapbook stores, and if you're using large pieces that's probably the way to go.  But if you're incorporating into cards, or any other smaller project, I like hand sueding best.  I'm sure there are a variety of processes that are used for sueding, but I personally like the crimper method.  It only takes a couple minutes--so why not grab a bit of cardstock and give it a try!  You'll need a crimper, some cardstock scraps, and a pencil (preferably with ridges & not smooth). I've included some pictures to help you with the process, but if you have any questions please let me know.
Begin by choosing your cardstock scraps and running through the crimper a couple times.  You can crimp it in different directions if desired.  The crimper helps to break down the fibers in the paper faster.


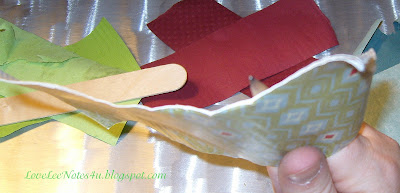
Using a pencil, smooth out the crimps holding the pencil on one side and smoothing with your thumb on the other side, repeating all around the cardstock until the paper starts to separate on the edges.


It will take a couple minutes to break down the fibers enough to begin to release.


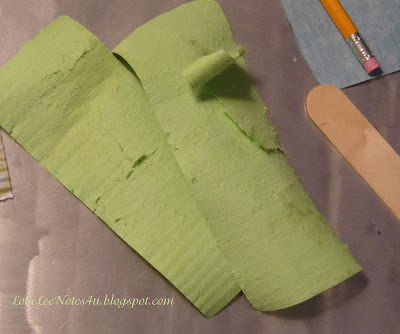
You can carefully begin to separate the layers.  If they don't release easily, do a little more work with the pencil.

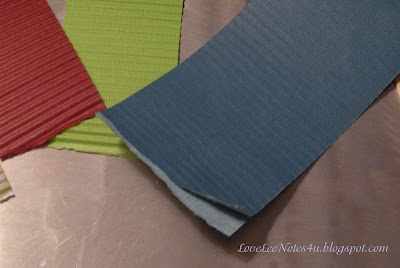
You might be able to see in this picture that there are more than just two layers of this cardstock.  In fact there are several layers.  The more time you spend breaking down the fibers, you will see more layers begin to separate.  I'm usually only patient enough for two layers.

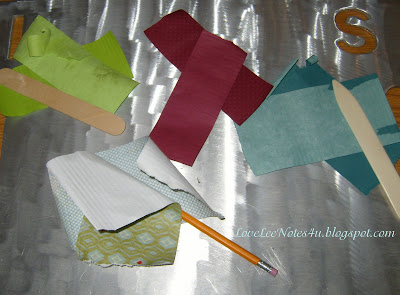
Here you can see that I used a variety of tools:  pencil, bone folder, & wooden stick.  The pencil was by far the easiest & most efficient.  The core'dnation blue cardstock (CS) was sueded with a bone folder, and I wasn't patient enough for it to release--so you can see the result is an incomplete release.  I used a wooden stick for the green CS, but I finished with the pencil as it was going too slow...also wanted to show the layered effect.  I used white core double sided CS & textured burgundy CS with the pencil--perfect release.
  

Using the white core sueding for snow drifts, I made a quick wintery card.  Stamps:  CTMH Snow Friends: stamped once with archival black & then layered with Snow Cap white paint.  I used Snow-Tex with my finger to swipe over the smokey blue cardstock for a winter wind effect.  I colored the snowman cap & bird with Copics Sketch markers, then used Spica for a bit of glitz on the Snowman & the snow drifts.  Finished up with a white ribbon.
There are so many uses for this paper, I'm sure you've already got ideas.  I used it for the flowers on this framed art.  You probably can't see it well in this picture, but the softness of the paper makes you want to reach out and touch the flower petals. 

Tim Holtz Tattered Flowers Sizzix Die - glued sueded paper onto
grungeboard, die cut the flowers, inked the edges, and secured with a brad.

I hope you have fun trying this technique -- It's a lot of fun, and you'll love the texture. 


Friday, October 15, 2010

Tea Time break


I love my tea breaks when crafting--actually I just love my tea breaks.  I thought I'd share an especially fun one using my Mickey Mouse tea cups & tray, with my niece Emily (of course I picked this tea break in honor of our recent family trip to see the Mouse himself).  Emily got to spend the summer with us last year and I got to introduce her to the fun world of card-making, scrapbooking, and paper crafting!  I'd like to think she's hooked.  ha!  In the midst of our crafting frenzy we took our tea break.  Maybe this will inspire you to take a tea break today in the midst of the chaos.  Enjoy!


Emily making her Hot Cocoa Station (directions in earlier post)


Be sure to check out my blog next week for a technique posting using a crimper and cardstock...and it won't be for crimping.  Curious?  Stay tuned...

Tuesday, October 12, 2010

Paper Bag Books - Disney Vaca

Getting back into the swing of things after a fun family vacation to Walt Disney World is not easy...but we do what we must.  I love making paper bag albums--last year for my hubby's birthday I organized a trip to Springfield, IL to celebrate Abraham Lincoln's 200th birthday.  Instead of just putting a note in a card, I wanted to hand him something a little more tangible--so I made a paper bag album completely out of a brochure booklet for that area.  I'll have more on that in an upcoming post--but today I thought I'd share this paper bag album I made, prior to our trip, out of Disney brochures.  It was fun to make, and adding all those geometric ribbons gave it that extra pizzaz.  For this album I used four plain, primary colored paper bags and two large binder rings.  I used cardstock to mount some of the brochure highlights, to make into information tags for the pockets.  I'll be adding pictures from our trip to the back of the tags--just as soon as I pick out my favorites.  =)  That might take a bit longer.  Enjoy!


Monday, October 4, 2010

Masks of the Manor...French Manor


This is my Cricut Circle Weekly Challenge entry (for more information about Cricut click HERE).  Using the French Manor cartridge & my Gypsy (for more information about the Gypsy click HERE) I came up with these fun masks--since this is the Trick or Treatin' time of year.  If you haven't seen these masks on the cartridge, it's because they're not actually on there--at least not in the form I've created.  But if you'll look a little closer you might see cuts for a crown border, peacock feathers/border, and border; add in some flourishes and tweak them with a bit of Gypsy welding and you've got yourself some masks.  I mounted them to a canvas I painted black with silver accents. 

This mask was made using the border cut...called border, and I added welded flourishes for both the "mustache" and headpiece.  To tone down the yellow eyes I added vellum.  Some wired ribbon & Martha Stewart glitter flakes finish out the piece.  You can almost imagine the bat's wings reflected in the eyes...hmmm?

This mask uses the crown border using contour hide feature & a bit of scissor manipulation.  The hair was easy...using the shift feature for the crown border.  I added a bit of bling on the mask & eyes, some vellum I printed for the 'trick or treat' eyes, & crackle glaze for the "dancing birds".  I imagine this one's envisioning a candy run!

This mask uses the feather & feather border cuts.  The feathers were welded together & three borders were cut for its crowning glory.   I used rhinestones for the eyes, & stamped & accented all the layers with perfect pearls powder.  This is one proud peacock mask!

As I'm writing this, we're getting ready to head out to Disney World for a week of vacation.  If anyone is interested in the Gypsy files, or needs more deets on this project, feel free to send me an email or leave me a comment.    Happy Crafting!