Tea Party Part1 - The Theme
Tea Party Part2 - The Menu
Tea Party Part3 - 1200+ Cricut Cuts
 |
| setting up the tables |
 |
| the screen is being set up for a Mary Poppins sillouette |
 |
| the umbrellas were hung by strings that you couldn't see unless up close and the daisies were strung on to fishing filament |
 |
| prepping the daisy centerpieces |
 |
| this became a favorite setting for picture takers |
 |
 |
| Beverage Table -- three specialty teas from England market Mango, Summer Tea, & Chocolate Cream Tea And soon to be set up with flowering teas, and English Lemonade fizzy drink, & Orange Squash |
 |
| Our table of tea cups for those that didn't have one to bring... or forgot theirs. |
 |
| Tea cup table |
 |
| Set up for our photographer to take photos -- the trees lit up with beautiful white lights |
 |
| Not quite finished, our table for collecting tickets and greeting our guests--see all the confetti?! |
 |
| Our entrance into the Tea Party -- the balloon daisies were made by one of our missionaries! |
Becca at Amazing Paper Grace has a video tutorial of a similar box she made that is fabulous. I'll post the link at the end of this post as it may help you to visually create this box, but also give you more ideas for other size boxes. This is basically the same type of box as Becca's, but I figured out the dimensions a bit differently to hold 30+ "Tea & Conversation Cards" (you could also use these as business card holders).
For the cards I used Business Card sheets for the printer and typed up a variety of facts & trivia regarding the ceremony of tea, adding tea time watermark pictures in the background, and printed about thirty different cards for each box.
For the boxes:
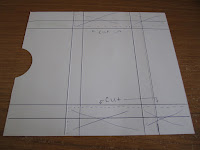
- Cut a piece of deco cardstock 6" x 7".
- With the 7" side against the top of your scoreboard, score at 2 1/4", 2 3/4", 5 1/8", 5 5/8"
- With the 6" side against the top of your scoreboard, score at 5/8", 1 1/8", 4 7/8", 5 3/8"
- Note where the flap of your box will be after you've completed scoring--the smaller of the three center boxes is your flap!
- For the center box on the other end (opposite the flap) use a circle punch to cut a half circle, which will make removing the cards easier.
- Starting on one side at the inside vertical score line, cut from flap edge to the last horizontal score line, and cut off side piece. Do this to both sides, as in the diagrams below. It should now look like the shape of a shirt.
- Use a corner rounder to round four corners (or just shape with your scissors).
- Fold on all the score lines.
- Apply strong adhesive to each side of end flaps (far side flaps only) where you cut your circle punch (on the deco side of your paper if you're using one-sided deco cardstock). Fold box with adhesive holding box shape together.
- Apply a small piece of velcro to flap to create a closure for your box.
- Decorate as desired. I used Martha Stewart punches to create the flowers for our tea party boxes.
If you're still a bit unsure of this technique, check out Becca's video tutorial for her box...and some other ideas too.
I'll be finishing the series by this weekend with everything finally put together for the main event. Maybe you'll find some inspiration along the way for a one-on-one tea with a friend, or a family get-together, or an office party, or whatever that special moment may be. =)
Blessings for a beautiful day! Lisa


This is the most amazing event ever...I wish I could come.I really do. I have never seen anything more beautiful, organized(thats a good thing from me) and so creative!.....sigh
ReplyDeletetake care, gerri
I can't wait till part 5 for the beautiful ending to your stunning tea. Also check out my blog tomorrow Sunday..you're in it! take care sweetie, gerri
ReplyDelete